
Roof flashing is the thin metal barrier installed around chimneys, vent pipes, skylights, valleys, and wall intersections to stop water from finding its way into your home. When flashing fails, it rarely announces itself with a dramatic leak on day one. Instead, homeowners notice a faint water stain on a ceiling, a musty smell in the attic, or soft drywall near a chimney breast months after the flashing actually let go. Repairing it properly requires more than a caulking gun and good intentions.
At Universal Roofs, we have spent two decades repairing flashing across Toronto rooftops that go through brutal freeze-thaw cycles every winter and intense summer heat every July. The right tools make the difference between a flashing repair that lasts fifteen years and one that fails again by next spring. This guide walks through exactly what a professional roofer carries onto a roof for a flashing repair, why each tool matters, and where homeowners tend to go wrong when they try to tackle it themselves.
Whether you are a hands-on homeowner planning a small chimney flashing patch or simply want to understand what you are paying for when you hire a contractor, this comprehensive guide covers the essential tools for roof flashing repair from measuring and cutting through sealing and safety.
Why the Right Tools Matter for Flashing Repair
Flashing repair looks deceptively simple from the ground. It is a piece of bent metal, after all. But the tools used to cut, shape, fasten, and seal that metal directly determine whether the repair sheds water or simply hides a leak for a few months. Using the wrong tool, such as a utility knife instead of aviation snips, or acrylic caulk instead of a proper roofing sealant, is one of the most common reasons a flashing repair fails within a single Toronto winter.
Metal flashing needs clean, straight cuts and consistent bends so it lies flat against the roof deck, siding, or masonry. A ragged cut edge or an uneven bend creates a gap that capillary action will exploit during a heavy rain. The correct tools also protect the surrounding roofing materials. A dull utility knife dragged across asphalt shingles to trim flashing can gouge the granule surface, shortening the life of shingles that otherwise had another decade left in them.
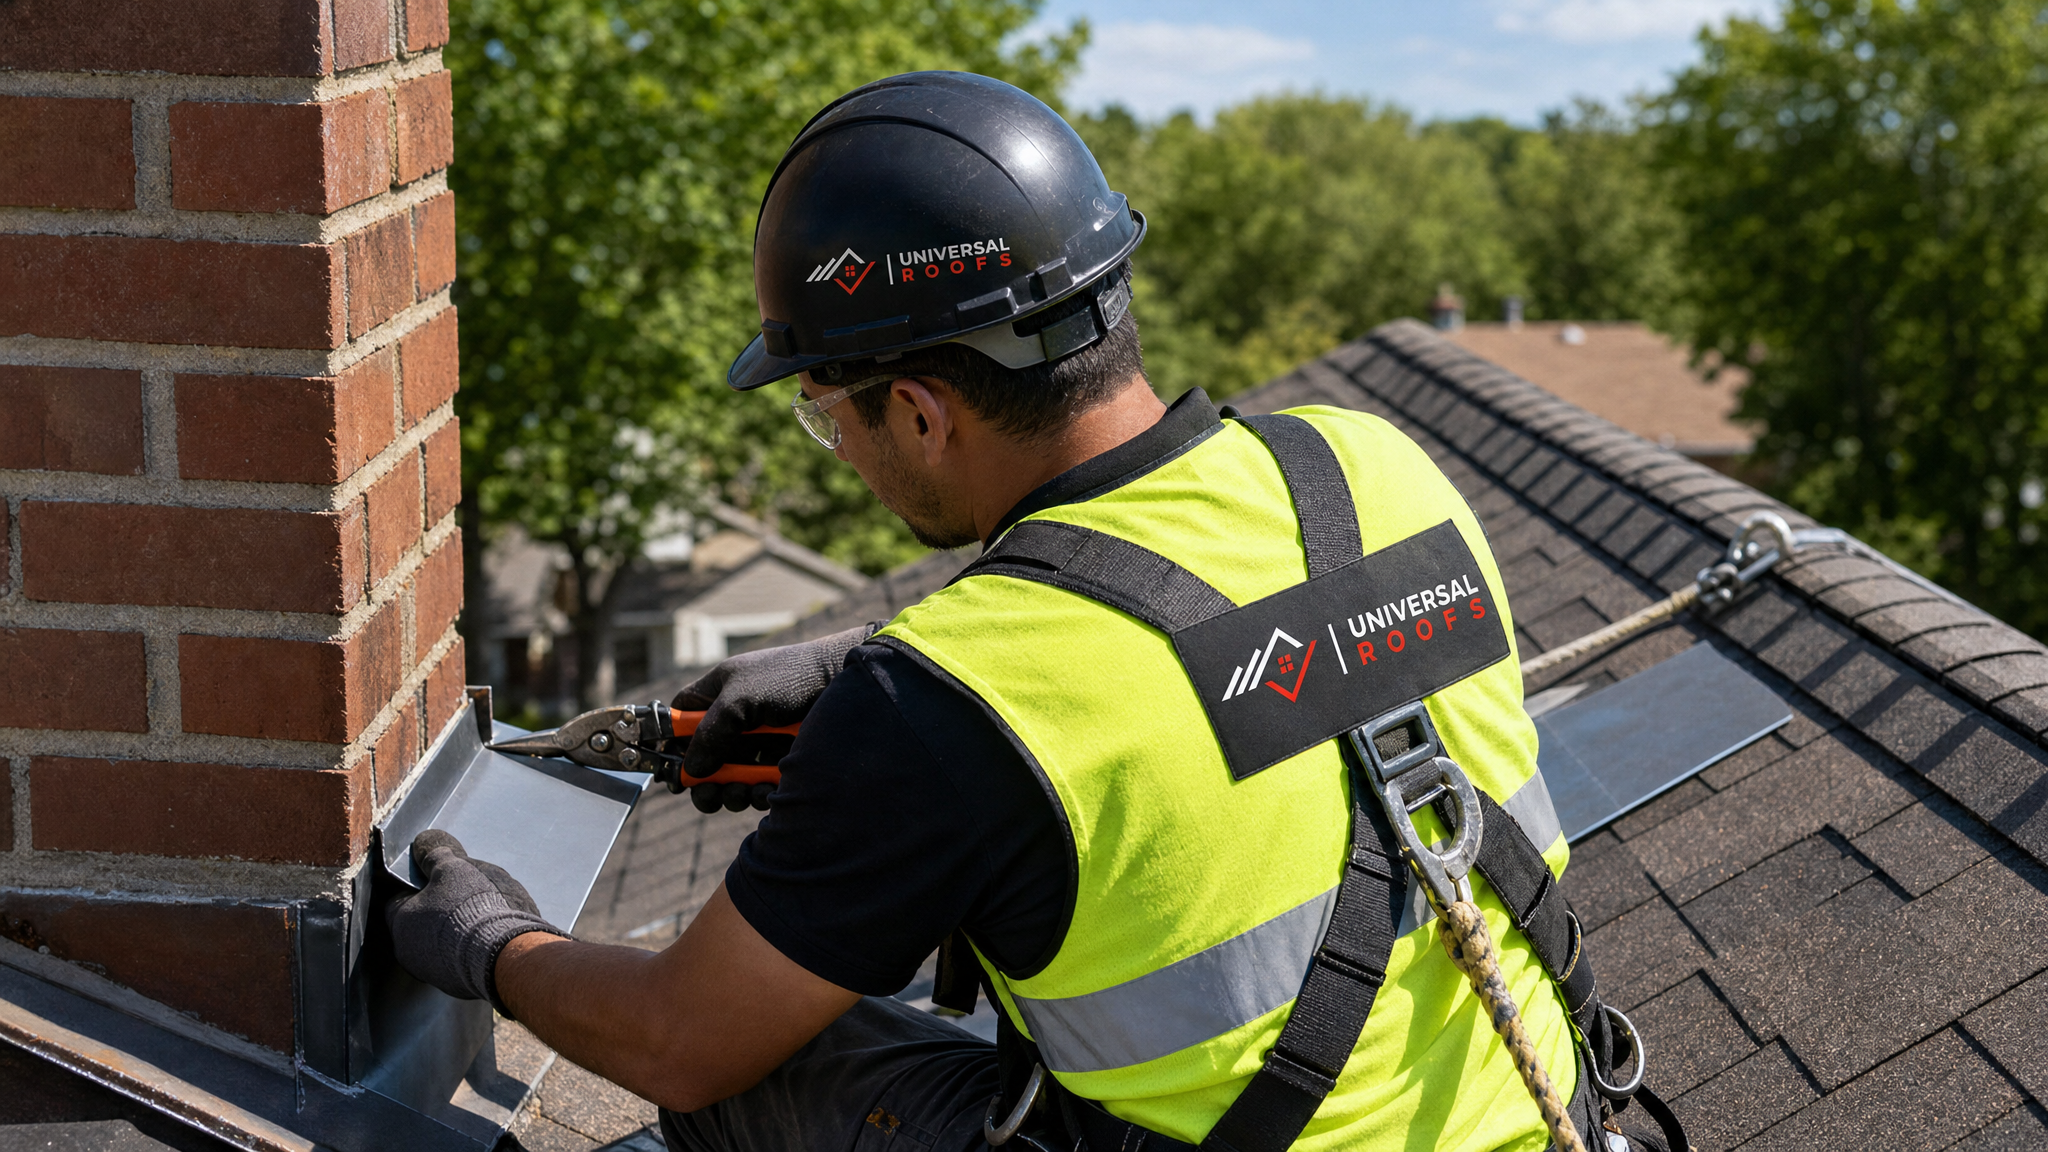
There is also a safety dimension. Flashing repairs almost always happen at roof valleys, chimney bases, or steep slopes near the eaves, which are the most hazardous parts of any roof. Professional-grade tools, proper fall protection, and stable ladder setups are not optional extras; they are what allow a repair to be done correctly on the first attempt rather than rushed because someone is uncomfortable being up there. If your home needs more than a spot repair, our roof repair team can assess whether flashing alone will solve the problem or whether surrounding shingles need attention too.
Measuring, Marking, and Layout Tools
Every flashing repair starts on the ground, or at least it should. Before a single piece of metal is cut, the damaged area needs to be measured accurately and the replacement piece laid out with margin for error.
- Tape measure (8m or longer): Used to measure the length of the flashing run, the height of step flashing pieces, and the reveal needed at valleys. A locking tape prevents the blade from retracting mid-measurement on a sloped surface.
- Combination square or speed square: Essential for marking 90-degree bend lines on flashing stock so folds come out square rather than skewed.
- Chalk line: Snaps a straight reference line across a valley or wall for trimming flashing to a consistent width, particularly useful on longer runs where a tape measure alone invites drift.
- Fine-tip permanent marker or scribe: Metal does not hold pencil marks well, especially galvanized steel or aluminum with a slight sheen. A marker or scratch awl gives a visible, durable cut line.
- Digital angle finder or protractor: Roof pitches and wall-to-roof transitions are rarely a clean, textbook angle. An angle finder lets you replicate the exact bend needed rather than guessing and reworking metal that has already been cut.
Skipping accurate layout is the single biggest reason DIY flashing repairs end up with visible gaps or flashing that has to be bent twice, work-hardening the metal and making it prone to cracking at the fold line.
Cutting and Shaping Tools
Once the layout is marked, the metal needs to be cut cleanly and formed to match the roof geometry. This is where the quality of your tools shows up most obviously in the finished repair.
| Tool | Best Used For | Typical Cost Range (CAD) | Skill Level |
|---|---|---|---|
| Aviation snips (left, right, straight-cut set) | Cutting aluminum, galvanized steel, and copper flashing to size | $35–$75 | Beginner to intermediate |
| Sheet metal brake (bench or portable) | Creating clean, consistent bends for step flashing and counter-flashing | $150–$600 | Intermediate |
| Hand seamer / metal folding pliers | Small on-roof bends and crimping flashing edges | $25–$60 | Beginner |
| Angle grinder with metal cutting wheel | Trimming heavier gauge flashing or cutting through old fasteners | $80–$200 | Intermediate to advanced |
| Tin snips (heavy duty) | General purpose cutting on thinner aluminum flashing | $20–$45 | Beginner |
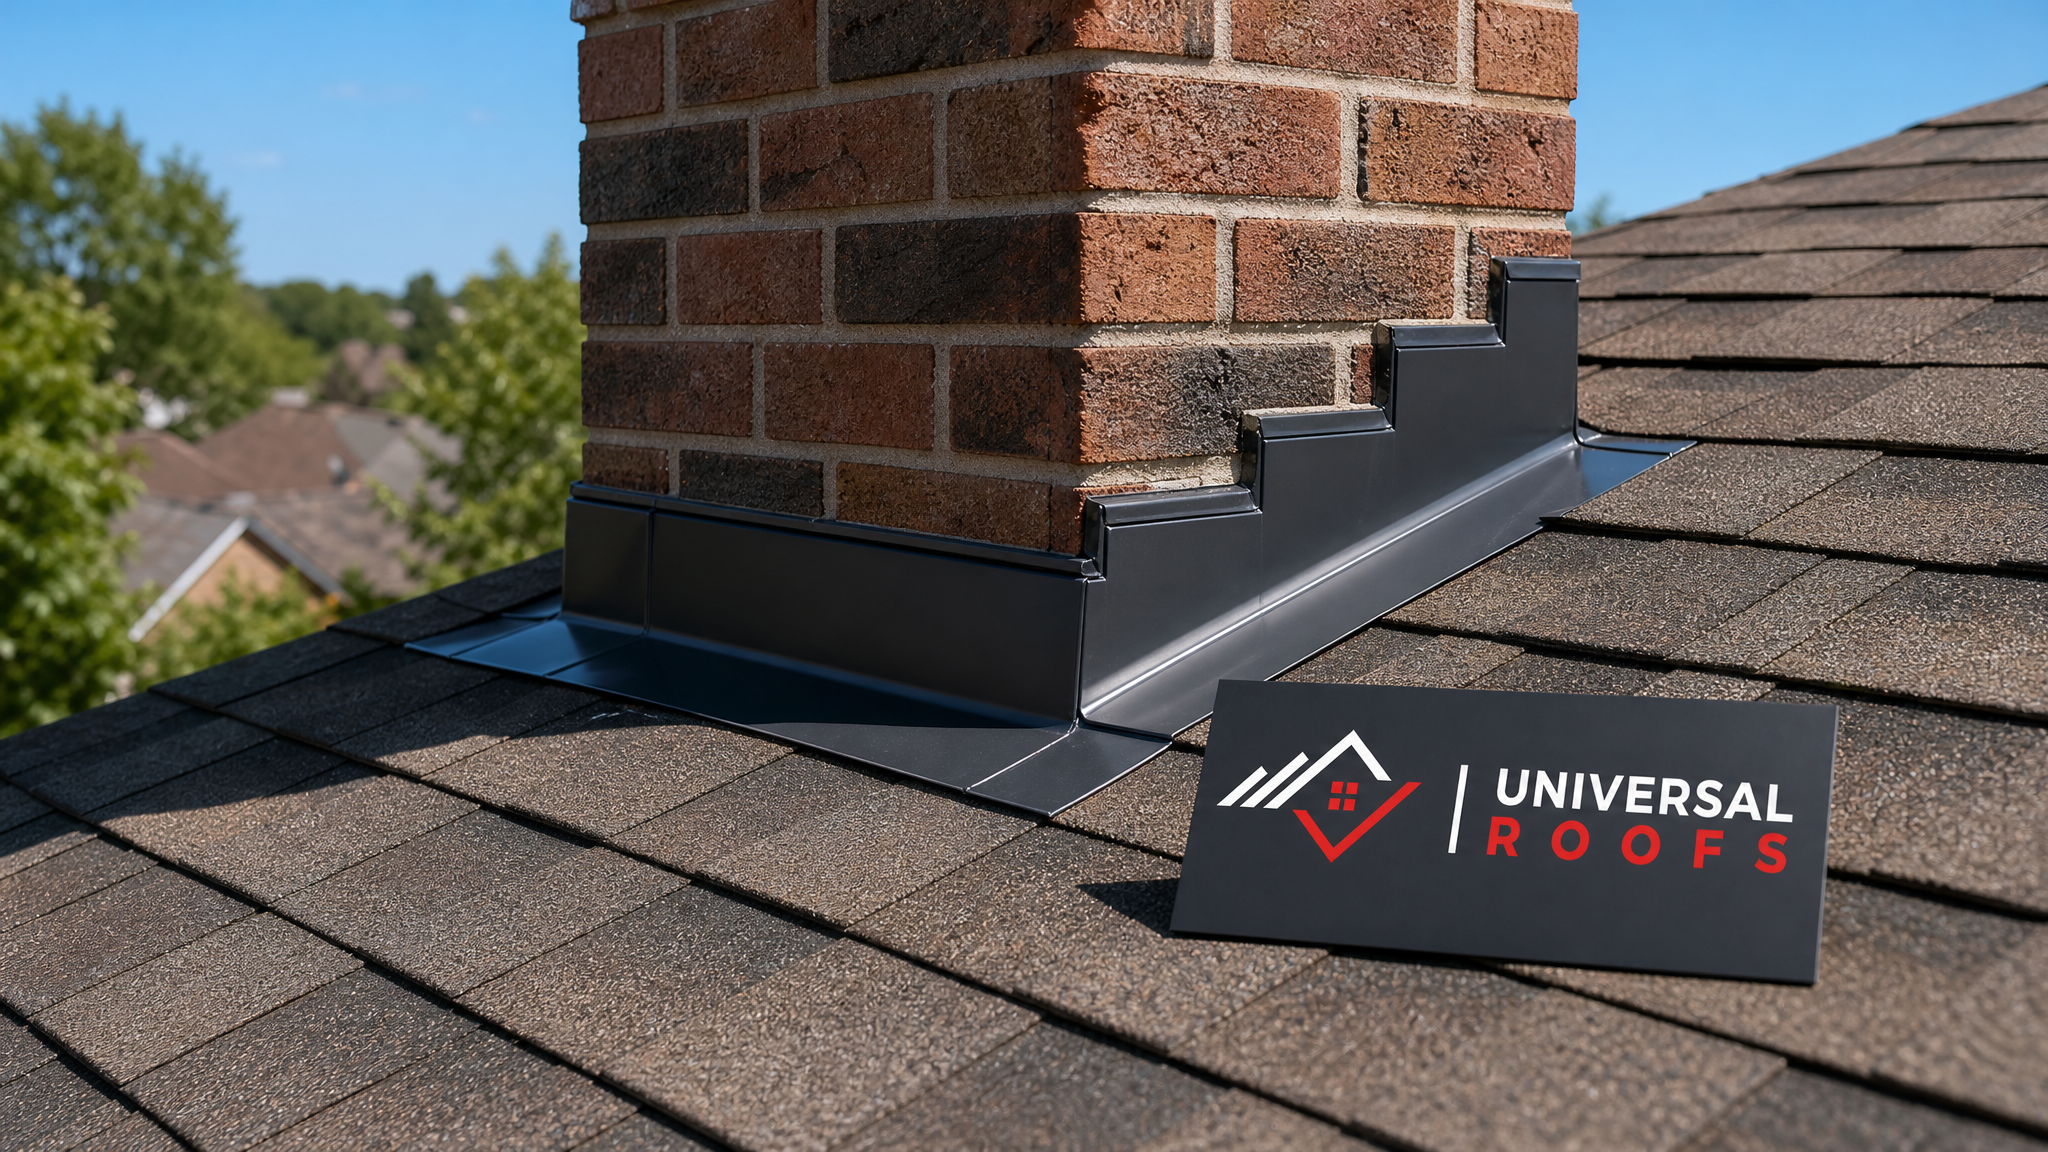
Aviation snips are the workhorse of any flashing repair kit. The colour-coded handles (green for straight and right curves, red for left curves, yellow for straight cuts) let you switch quickly between cut directions without fighting the metal. A sheet metal brake produces the crispest bends, which matters most on visible areas like chimney counter-flashing where a wavy fold is obvious from the ground.
Copper flashing, increasingly popular on higher-end Toronto homes for its longevity and patina, requires slightly different handling than aluminum or galvanized steel. It work-hardens faster, so fewer, more deliberate bends produce a better result than repeated adjustments.
Fastening and Sealing Materials
Cutting and bending flashing correctly is only half the job. How it is fastened and sealed determines whether it survives freeze-thaw cycling, wind uplift, and thermal expansion over Toronto’s four distinct seasons.
| Material | Purpose | Notes for GTA Climate | Approximate Lifespan |
|---|---|---|---|
| Roofing nails (ring-shank, corrosion-resistant) | Fastening flashing to the roof deck without penetrating through to the underside | Use hot-dip galvanized or stainless to resist rust from moisture cycling | 20–30 years |
| Butyl rubber sealant tape | Sealing flashing overlaps and penetrations without hardening or cracking | Stays flexible through winter freeze, unlike standard silicone | 10–15 years |
| Polyurethane roofing sealant | General sealing at flashing edges, fastener heads, and transitions | Handles UV exposure and summer heat better than acrylic caulk | 8–12 years |
| Rubberized asphalt underlayment | Additional waterproofing layer beneath flashing at vulnerable points | Self-seals around fastener penetrations, useful at valleys | 15–20 years |
| Copper or stainless fasteners (for copper flashing) | Prevents galvanic corrosion when fastening copper flashing | Never pair copper flashing with galvanized nails; the metals react | 25+ years |
One mistake we see constantly on Toronto rooftops is the use of ordinary silicone caulk as a flashing sealant. It looks fine when applied on a warm afternoon, but silicone hardens and cracks after a winter or two of expansion and contraction, especially where flashing meets brick or stucco. Butyl tape and purpose-made polyurethane roofing sealants stay pliable and continue to move with the metal rather than tearing away from it.
Safety Equipment for Working at Flashing Locations
Flashing failures concentrate at the most awkward parts of a roof: chimney bases on steep slopes, valleys where two roof planes meet, and wall-to-roof transitions near dormers. These are also the sections where a fall is most likely. No list of tools for flashing repair is complete without the safety equipment that makes the work possible in the first place.
- Fall-protection harness and safety rope: Anchored to a roof anchor point or ridge, non-negotiable for any repair on slopes steeper than about 4:12 or on second-storey and taller homes.
- Roof jacks and toe boards: Create a temporary, stable platform to stand and kneel on while working around a chimney or valley, reducing strain and slip risk.
- Non-slip roofing boots with good tread: Standard work boots do not grip asphalt shingles or metal flashing the same way purpose-built roofing footwear does, particularly when the surface is damp from morning dew.
- Hard hat, safety glasses, and work gloves: Cut metal edges from aviation snips are sharp enough to cause serious lacerations, and debris falling from above a work area is a real risk during any roof repair.
- Extension ladder with stabilizer and ladder levellers: Getting onto the roof safely is where many DIY repairs go wrong before the actual flashing work even begins.
This is the point where many homeowners reasonably decide the job belongs to a professional crew. Working at height on a steep or wet roof, particularly around a chimney where there is limited room to manoeuvre, carries real risk without the right anchor points and harness setup. Our team treats fall protection as standard on every job, not an optional add-on, which is one reason our customer reviews consistently mention thorough, careful work around chimneys and skylights.
Common Flashing Repair Locations and the Tools Each One Needs
Not every flashing repair calls for the same toolkit. The location on the roof changes what you need most.
| Flashing Location | Primary Tools Needed | Common Failure Point | Difficulty for DIY |
|---|---|---|---|
| Chimney (step and counter-flashing) | Aviation snips, hand seamer, angle grinder, mortar chisel | Counter-flashing pulling away from mortar joints | High — professional recommended |
| Roof valleys | Chalk line, tin snips, sheet metal brake, underlayment | Debris buildup causing water to back up under flashing | Moderate to high |
| Vent pipe boots | Utility knife, roofing sealant, replacement rubber boot | UV-cracked rubber collar around the pipe | Low to moderate — common DIY task |
| Skylight perimeter flashing | Hand seamer, butyl tape, manufacturer-specific flashing kit | Improper overlap sequencing letting water in at corners | High — professional recommended |
| Wall-to-roof (dormers, additions) | Sheet metal brake, aviation snips, polyurethane sealant | Missing or undersized kick-out flashing at the bottom edge | High — professional recommended |
Skylight flashing in particular deserves a note of caution. Manufacturer flashing kits are engineered to a specific sequence, and departing from that sequence, even with all the right tools, is one of the most common causes of skylight leaks we get called out to fix. If your skylight flashing is showing signs of failure, our skylights and skylight replacement teams handle both the glazing and the flashing as one integrated repair, which avoids the mismatched-sequence problem entirely.
Step-by-Step: How the Tools Come Together in a Real Repair
To put the toolkit in context, here is roughly how a chimney flashing repair unfolds on a typical Toronto home.
First, the damaged area is inspected and the old flashing, sealant, and any deteriorated underlayment are removed with a flat pry bar and utility knife. Old nails are pulled or cut flush with an angle grinder if they are seized. Next, the roof deck and surrounding shingles are checked for water damage or rot, since flashing failures often sit above a section of deck that has been absorbing moisture for months.
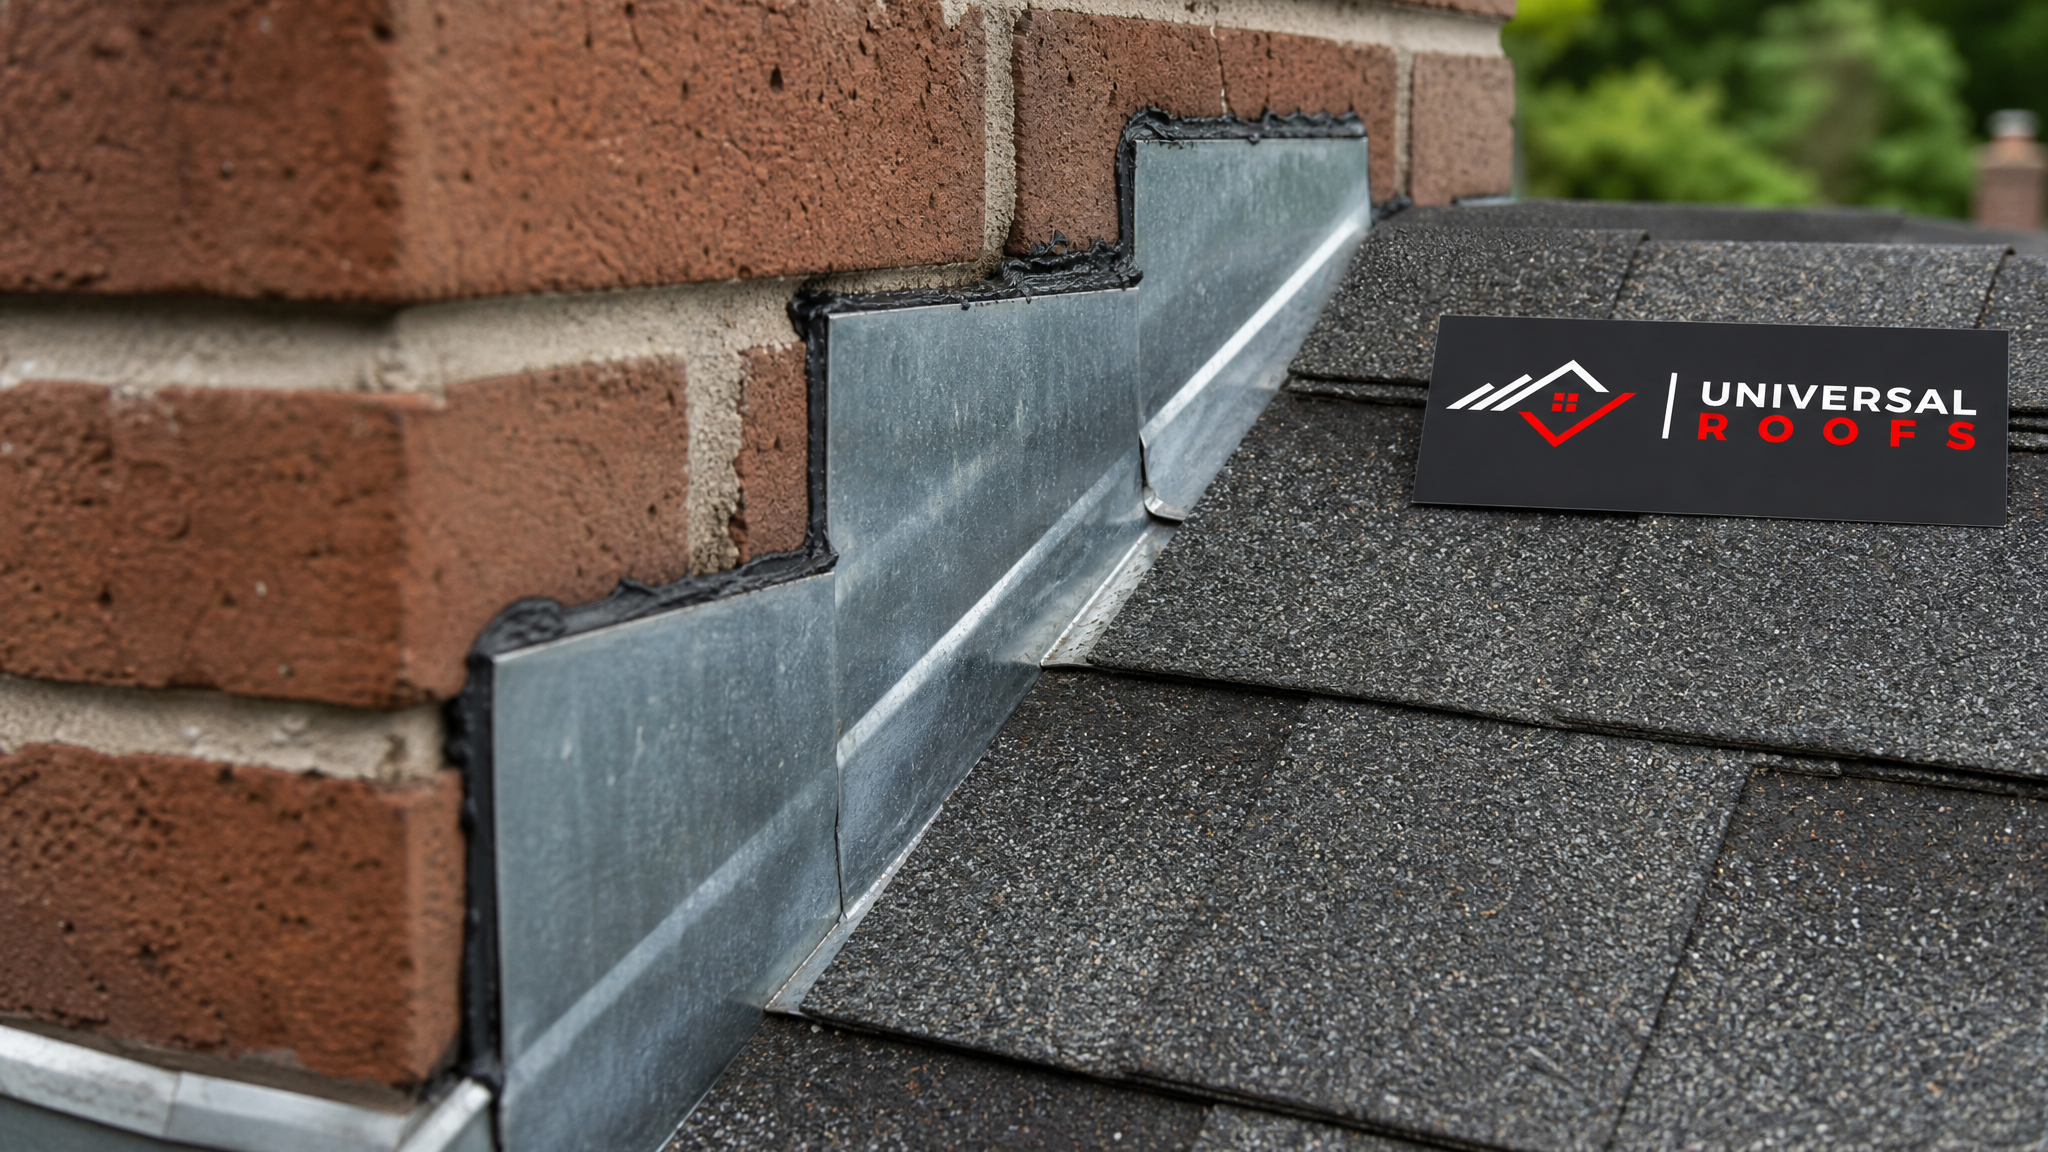
The replacement flashing is measured against the actual chimney or valley dimensions, not just the old piece, since masonry and roof lines shift slightly over decades. It is marked with a square and marker, cut with aviation snips, and bent to the correct angle using a hand seamer or bench brake. Step flashing pieces are woven between courses of shingles, one piece per shingle course, rather than installed as a single continuous strip, which is a detail that separates a lasting repair from a temporary patch.
Counter-flashing is then set into a reglet cut into the mortar joint (on masonry chimneys) or tucked under existing siding, and sealed with a polyurethane roofing sealant or butyl tape rather than surface-applied caulk alone. Finally, fasteners are set at the top edge only, never through the exposed face of the flashing where a nail head becomes its own leak point, and the surrounding shingles are re-set over the new step flashing.
This sequencing, more than any single tool, is what determines whether a flashing repair lasts five years or twenty-five. It is also the part of the job that is hardest to shortcut successfully, which is why so many well-intentioned DIY repairs fail even when the homeowner owns quality tools.
DIY Versus Calling a Professional: What to Weigh
Owning the right tools does not automatically make a flashing repair a good DIY candidate. A few honest questions help decide which side of that line a given repair falls on.
If the flashing in question is a vent pipe boot on a single-storey roof with a gentle pitch, and you are comfortable on a ladder, this is a reasonable weekend project with a modest tool investment. If the repair involves a chimney, a valley, a skylight, or any roof steeper than roughly 6:12, the combination of fall risk, sequencing complexity, and the cost of getting it wrong (interior water damage, mould remediation, structural rot) tips the balance toward hiring a professional.
There is also a warranty consideration. Flashing tied into a roof system that is still under a manufacturer or workmanship warranty can void that coverage if repaired incorrectly by an unlicensed party. A professional crew from our roof replacement or repair division carries the licensing, insurance, and manufacturer certifications to keep that warranty intact. For flat roof sections where flashing meets a membrane rather than shingles, the tools and techniques shift again toward heat welding and specialized membrane adhesives, which is why we treat flat roofing flashing as its own specialty within the team.
Seasonal Timing for Flashing Repairs in the GTA
Summer is genuinely the best window for flashing repair work across Toronto, Mississauga, Brampton, and the surrounding region. Sealants and adhesives cure properly in warm, dry weather, metal is easier to bend without cracking in moderate temperatures, and crews can work full days without the shortened daylight or ice hazards of late fall and winter.
That said, flashing problems discovered now, in early July, should not wait until autumn to get addressed. A small gap at a chimney or valley will only widen with the next heavy summer thunderstorm, and repairing it while conditions are favourable is far less costly than dealing with an active leak during a September rainstorm. If you noticed a ceiling stain or attic odour this spring, this is the ideal season to have it looked at properly rather than deferred.
Frequently Asked Questions About Roof Flashing Repair Tools
What are the essential tools for roof flashing repair a comprehensive homeowner needs to get started?
Can I use regular caulk instead of specialized roofing sealant for flashing repair?
Is a sheet metal brake necessary for a small flashing repair?
What tools do professionals use that most DIYers don’t have for essential tools for roof flashing repair?
How do I know if my flashing needs a repair or a full replacement?
Is summer a good time to schedule a roof flashing repair in Toronto?
Need Help With Essential Tools for Roof?
Flashing repair is one of those roofing tasks where the right tools matter, but the sequencing and safety setup matter even more. Universal Roofs has spent two decades handling exactly this kind of detailed repair work across the Greater Toronto Area, from a single chimney patch to a full flashing overhaul.
Call us today at (416) 732-2421 or request a free inspection to get started.
Universal Roofs proudly serves Toronto, Mississauga, Brampton, Vaughan, Markham, Oakville and the GTA since 2005.