
Metal roofing rewards Toronto homeowners with 40-plus years of service life, but almost every leak we investigate on a metal roof traces back to the same culprit: flashing that was skipped, undersized, or installed with the wrong technique for a standing seam or exposed-fastener panel system. The panels themselves rarely fail. The transitions around them do.
Flashing is the unglamorous sheet metal and sealant detailing that redirects water away from every penetration, edge, and plane change on your roof — chimneys, valleys, walls, skylights, vents, and the eaves and rakes at the perimeter. On a metal roof, flashing has to do more work than on asphalt shingles because metal panels expand and contract with temperature swings far more aggressively, and the freeze-thaw cycles we get every winter in the GTA put constant stress on every joint. Get the flashing wrong and water finds its way into the attic within a season or two, even if the panels themselves are rated for decades.
In this guide we break down the eight flashing solutions every metal roof needs, how each one works, what it costs installed in the Toronto area, and the warning signs that tell you a flashing detail has already failed. Whether you are planning a new metal roof, comparing quotes from contractors, or troubleshooting a leak on an existing one, this is the reference to work from.
Why Flashing Matters More on Metal Roofs Than Asphalt
Asphalt shingles overlap each other in a shingled pattern that sheds water fairly forgivingly, and the material itself has some give. Metal roofing is different. Panels are rigid, seams are engineered to interlock or overlap in a specific direction, and the whole system relies on flashing to bridge any place where the panel pattern is interrupted. There is far less margin for error.
Metal also moves. A 12-metre run of steel or aluminum panel can expand and contract several millimetres between a cold January night and a hot July afternoon. Flashing details on a metal roof have to accommodate that thermal movement without cracking sealant, popping fasteners, or tearing at the seams. This is why the flashing solutions built specifically for metal roofing look different from the flashing used on shingle roofs — they use cleats, floating clips, and butyl tape systems designed to let the metal move without opening a gap for water.
Toronto’s climate compounds the problem. We see significant snow load, ice damming along eaves, and dozens of freeze-thaw cycles each winter that repeatedly expand ice in any tiny gap in a flashing joint. A flashing detail that would survive fine in a milder climate can fail here within a few years if it was not designed with our winters in mind. If you are budgeting for a full metal roof replacement, the flashing package deserves as much attention as the panel choice itself.
1. Ridge Cap Flashing
The ridge cap sits at the peak where two roof slopes meet, and on a metal roof it has to do two jobs at once: seal out wind-driven rain and snow while still allowing the attic to ventilate. Most quality ridge cap systems use a formed metal cap over a closure strip — either a foam closure profiled to match the panel ribs, or a vented closure that lets warm, moist attic air escape.
The mistake we see most often is a ridge cap installed without any closure strip at all, leaving gaps under the ribs that let blowing snow sift directly into the attic during a nor’easter. A proper vented ridge closure also plays a role in the health of your attic insulation and moisture control — something worth reviewing together with your attic ventilation setup whenever you are re-roofing.
2. Valley Flashing
Valleys concentrate more water than any other part of the roof, since they collect runoff from two full slopes and funnel it downward. On a metal roof, valley flashing is typically an open, W-profile metal channel that keeps water running down the centre and prevents cross-flow between panels on either side, which is what causes ice to back up under the panel edges.
Closed valleys, where panels are cut and interwoven without a dedicated metal channel, are more prone to trapping debris and are considerably harder to seal against ice damming. For anything with a moderate-to-steep pitch in our climate, an open metal valley with a wide enough channel — 400 to 500 mm is common — is the safer, more durable choice.
3. Chimney and Wall Step Flashing
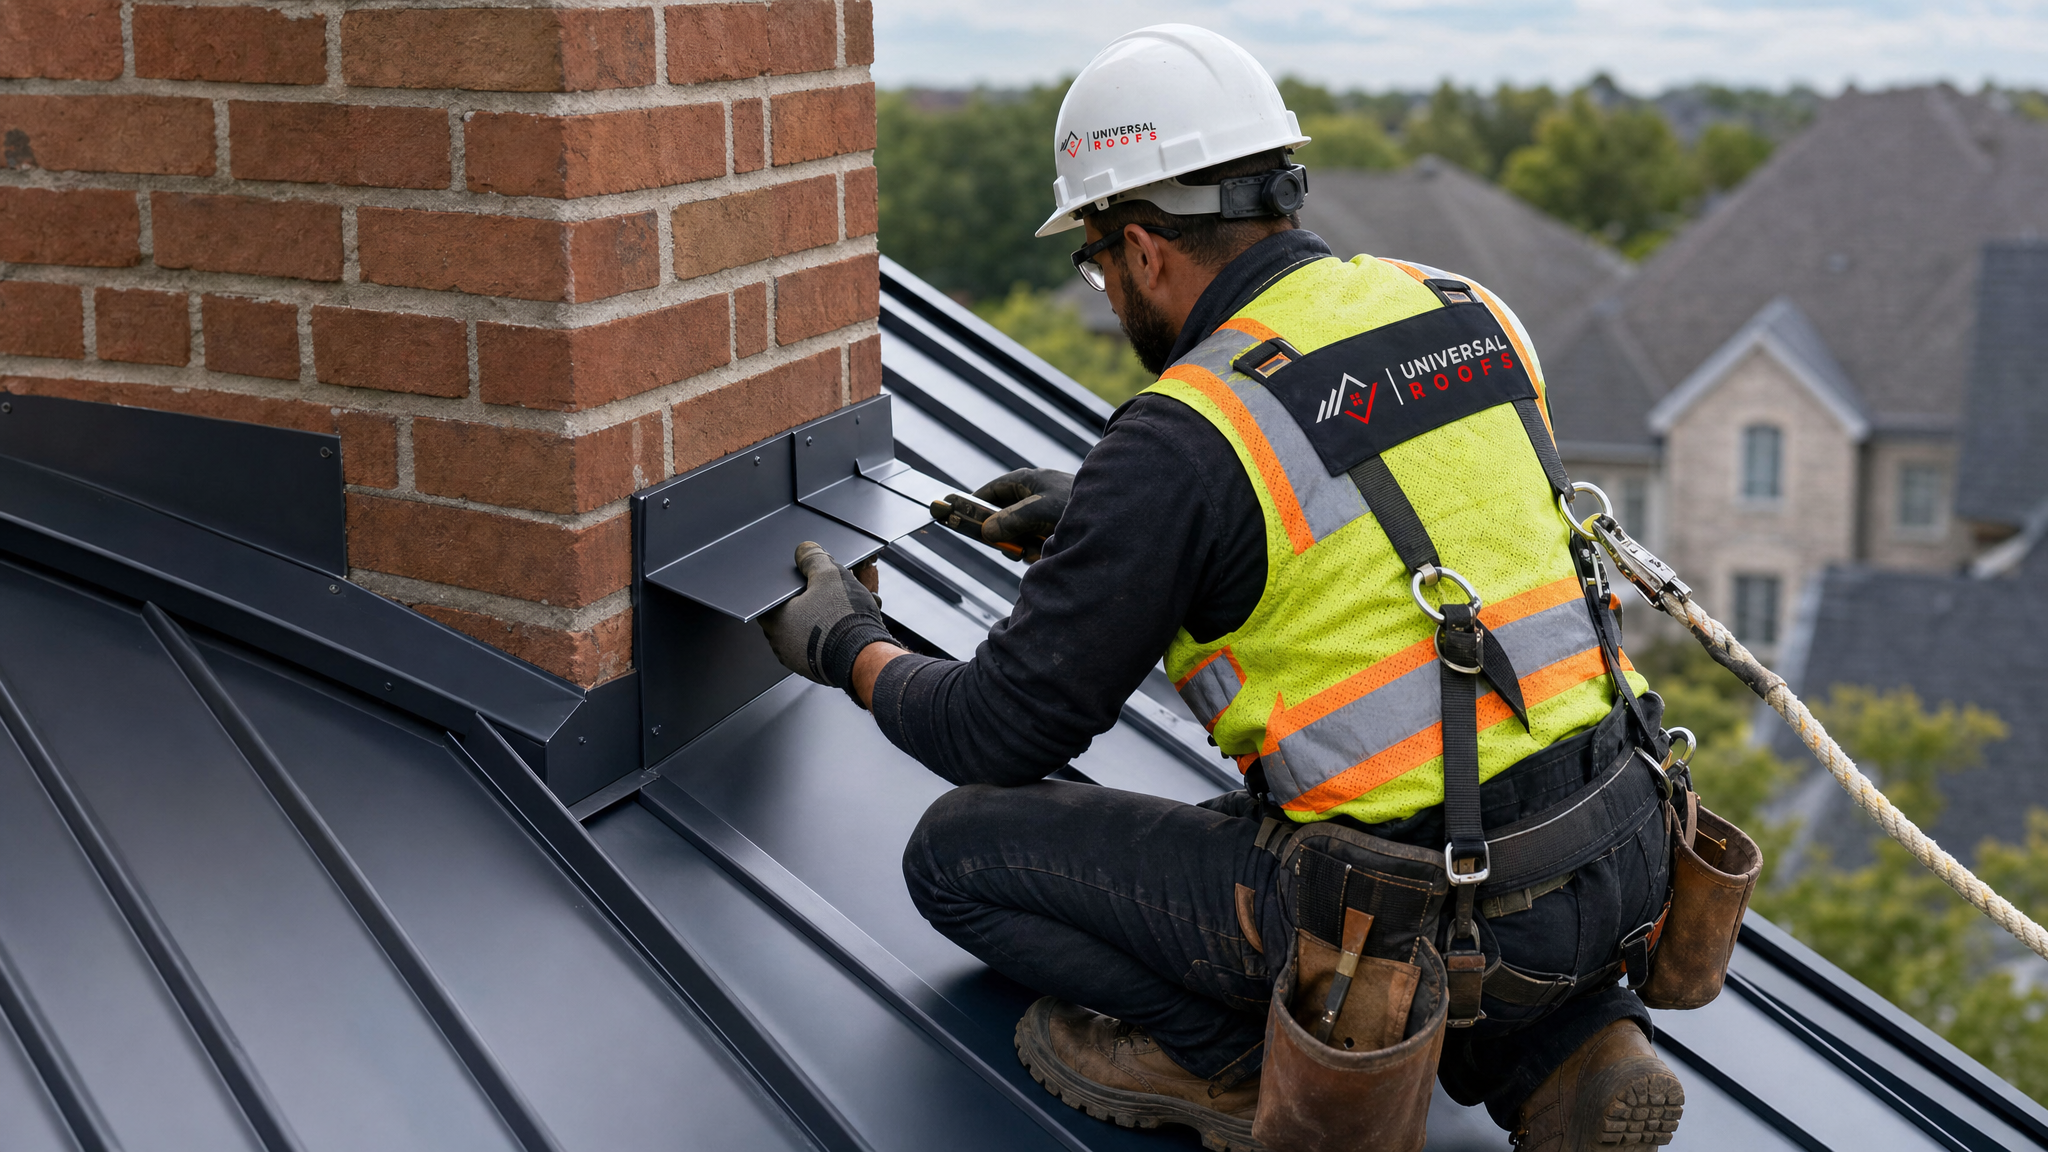
Anywhere a roof plane meets a vertical wall or chimney, you need step flashing woven with counter-flashing cut or ground into the masonry or siding. Step flashing is installed course by course as the roof goes up, with each piece overlapping the one below it, then a counter-flashing piece is set into a reglet cut in the brick to keep water from ever running behind the assembly.
On metal roofs this detail is often mishandled by crews used to asphalt shingle work, because the counter-flashing has to be hemmed and cleated to allow for the panel’s thermal movement rather than fastened rigidly. A chimney that was flashed for a shingle roof and simply re-flashed the same way for a metal upgrade is one of the most common leak points we find during roof repair calls in older Toronto neighbourhoods.
4. Eave and Drip Edge Flashing
The eave is the first line of defence against ice damming, which is a genuine problem across the GTA every winter when heat escaping from the attic melts snow on the upper roof, only for that meltwater to refreeze once it reaches the colder overhang. A proper drip edge, paired with an ice-and-water membrane running at least 900 mm up-slope from the wall line, keeps that backed-up water from wicking under the panel and into the fascia or soffit.
On metal roofs, the drip edge also has to be profiled to match the panel’s rib pattern so water is directed cleanly into the gutter rather than dripping behind it. A generic, flat drip edge on a ribbed panel roof almost always results in water tracking sideways and staining the fascia within a year or two.
5. Rake Edge Flashing
The rake edge — the sloped edge along the gable end — takes a beating from wind-driven rain because it is the edge most exposed to prevailing weather. Rake flashing on a metal roof needs a hemmed edge and, ideally, a cleat system that lets the panel expand and contract without pulling the flashing loose. A rake edge fastened directly through the face of the panel with exposed screws is a common shortcut that leads to fastener back-out and leaks within five to seven years, well short of what the panel itself is rated for.
6. Skylight and Roof Window Flashing
Skylights are one of the highest-risk penetrations on any roof, and metal roofing adds a wrinkle because most skylight flashing kits are designed around a shingle profile rather than a raised standing seam. Getting this detail right means either sourcing a metal-roof-specific flashing kit or having a sheet metal fabricator custom-form head, sill, and side flashing pieces that integrate with the panel ribs.
If you are planning a new skylight on a metal roof, it is worth reviewing options on our skylights page before panels go up, since flashing is far simpler to integrate during installation than to retrofit later. For an ageing skylight already showing staining or condensation at the frame, our skylight replacement service typically includes a full flashing rebuild rather than just resealing the old kit, since old sealant-dependent flashing rarely holds up long-term.
7. Pipe Boot and Vent Flashing
Plumbing stacks, exhaust vents, and other round penetrations need a pipe boot flashing that seals tightly around the pipe while still shedding water down the slope. On metal roofs, the best pipe boots use a metal base with a flexible rubber or silicone collar rather than an all-rubber boot, because an all-rubber boot’s base cracks and curls under UV exposure and freeze-thaw cycling far faster than a metal-based boot does.
We replace more failed rubber pipe boots on 10-to-15-year-old metal roofs than any other single flashing component, simply because the rubber degrades on its own schedule regardless of how well the rest of the roof is holding up. If your roof is due for penetration flashing replacement, it is a good moment to have the whole roof assessed rather than patching one boot at a time.
8. Endwall, Sidewall, and Transition Flashing (Including Flat Roof Tie-Ins)
Endwall flashing seals the top edge where a sloped metal roof plane runs into a wall perpendicular to the slope, and sidewall flashing handles the parallel case. Both need to be woven with counter-flashing exactly like chimney details, with special attention paid where a sloped metal section transitions into a lower-slope or flat section, such as over a rear addition or garage.
These transition zones are notoriously leak-prone because two different roofing systems, with two different expansion behaviours, meet at one seam. If your home has a metal roof over the main structure and a flat roofing section over an addition or bay window, the transition flashing between them deserves particular scrutiny during any inspection, since it is the single most common leak point we find on mixed-roof-type homes across Toronto, Mississauga, and Vaughan.
Flashing Materials Compared
Not every flashing material performs the same way on a metal roof, and matching materials correctly also prevents galvanic corrosion, which happens when dissimilar metals touch in the presence of moisture and one metal corrodes rapidly at the contact point.
| Material | Best Paired With | Typical Lifespan | Notes |
|---|---|---|---|
| Galvanized steel | Steel panel roofs | 25-35 years | Affordable; must match panel coating to avoid corrosion |
| Aluminum | Aluminum panel roofs | 35-45 years | Will not corrode near masonry or mortar; lightweight |
| Copper | Copper or premium standing seam | 60+ years | Premium cost; patinas over time; avoid contact with steel |
| Prefinished steel (Kynar/PVDF coated) | Coloured steel panels | 30-40 years | Colour-matched; coating can chip if bent on site in cold weather |
| Rubber/EPDM pipe boots | Any panel type (penetrations only) | 8-12 years | Shortest-lived component; plan for periodic replacement |
Signs Your Metal Roof Flashing Has Already Failed
Flashing failures are rarely dramatic at first. They show up as small clues long before a ceiling stain appears, and catching them early is far cheaper than waiting for interior damage.
| Warning Sign | Likely Location | Urgency | Recommended Action |
|---|---|---|---|
| Rust streaking below a panel seam | Ridge or valley flashing | Moderate | Schedule an inspection within weeks |
| Ceiling stain near a chimney | Chimney step/counter-flashing | High | Book a roof repair assessment immediately |
| Ice buildup at the eaves each winter | Eave/drip edge flashing, attic ventilation | Moderate | Inspect attic insulation and eave membrane before next winter |
| Cracked or curled rubber around a vent pipe | Pipe boot flashing | Moderate | Replace the boot before the next rainy season |
| Daylight visible around a skylight frame | Skylight flashing | High | Arrange skylight replacement or flashing rebuild |
| Loose or lifted panel edge at the rake | Rake edge flashing | High | Have fasteners and cleats re-secured promptly |
Installed Cost Guide for Metal Roof Flashing (Toronto Area)
Pricing varies with material, roof pitch, and access difficulty, but the ranges below reflect what we typically see quoted across the Toronto, Peel, York, Halton, and Durham regions for supply-and-install flashing work on an existing or new metal roof.
| Flashing Type | Typical Installed Cost (CAD) | Timeframe | Complexity |
|---|---|---|---|
| Ridge cap with vented closure | $12–$20 per linear metre | Half day | Low |
| Open valley flashing | $18–$30 per linear metre | Half to full day | Moderate |
| Chimney step and counter-flashing | $800–$2,000 per chimney | 1 day | High |
| Skylight flashing kit (custom-formed) | $600–$1,500 per skylight | 1 day | High |
| Pipe boot replacement | $150–$350 per penetration | 1-2 hours | Low |
| Endwall/transition flashing | $25–$40 per linear metre | 1 day | Moderate to high |
Maintenance Tips to Extend Flashing Life
Good flashing installation buys you decades of service, but a few habits stretch that lifespan even further and catch small problems before they become interior leaks.
- Have your roof inspected every one to two years, with particular attention to sealant at fasteners and pipe boots, since sealant degrades faster than metal does.
- Clear debris from valleys each autumn — trapped leaves and needles hold moisture against the flashing and accelerate corrosion.
- After any severe wind or hailstorm, check for lifted rake or ridge flashing before the next rain event.
- Keep gutters clear so water is not forced to back up under the eave flashing during heavy rain.
- Address ice damming at the source by improving attic insulation and ventilation rather than only patching the eave flashing.
Choosing a Contractor for Metal Roof Flashing
Flashing work is where roofing experience shows the most. Ask any contractor quoting your project how they detail chimney counter-flashing, whether they use cleats to accommodate thermal movement at the rake and eave, and whether their skylight flashing is custom-formed for your specific panel profile or adapted from a generic shingle kit. Vague answers to any of those questions are a red flag on a metal roof project specifically, even from a crew with solid asphalt shingle experience.
Universal Roofs has been detailing metal roof flashing across the GTA since 2005, and our crews fabricate custom flashing on site rather than relying on generic stock pieces that do not match your panel profile. You can read what past clients have said about our workmanship on our reviews page, or find quick answers to common roofing questions on our FAQ page. We serve homeowners across Toronto, the Peel Region, York Region, Halton Region, and Durham Region, and if your roof is due for a full replacement rather than a flashing repair, our roof replacement team can walk you through metal panel and flashing options together as one package. Learn more about our history and crews on our about page.
What are the must have roof flashing solutions for metal roofs?
How often should metal roof flashing be inspected?
Can old shingle roof flashing be reused on a new metal roof?
Why does my metal roof leak at the chimney even though the panels look fine?
What is the best material for metal roof valley flashing in Toronto’s climate?
How much does it cost to fix failed roof flashing on a metal roof?
Need Help With 8 Must Have Roof?
Getting all eight flashing details right is the difference between a metal roof that lasts 40-plus years and one that develops leaks within a decade. Universal Roofs has been fabricating and installing metal roof flashing across the GTA since 2005, and we stand behind every detail we install.
Call us today at (416) 732-2421 or request a free inspection to get started.
Universal Roofs proudly serves Toronto, Mississauga, Brampton, Vaughan, Markham, Oakville and the GTA since 2005.