
A heavy Toronto snowfall can pile 30 centimetres or more onto a roof in a single storm, and when that snow refuses to melt between systems, the weight and moisture add up fast. Homeowners across the GTA often ask the same question every winter: what is actually the safest and most effective way to get that snow off before it causes a leak, an ice dam, or a structural problem?
The honest answer is that roof snow removal is not a one-size-fits-all job. The right technique depends on your roof pitch, the type of shingle or membrane underneath, how much snow has accumulated, and whether ice has already formed at the eaves. Grab the wrong tool or work from the wrong angle and you can gouge shingles, crack flashing, or send yourself sliding off a ladder.
This guide walks through every method we use and recommend, from simple roof rakes homeowners can operate from the ground to the professional steam and hot-water systems we bring out for stubborn ice dams. We will also cover what NOT to do, how much each approach typically costs, and when it is time to stop experimenting and call in a crew.
Why Roof Snow Removal Matters in the GTA
Toronto and the surrounding regions sit in a snow-load zone where roofs are engineered to carry a specific amount of weight, but that engineering assumes the snow is dry and evenly distributed. In practice, a mid-winter thaw followed by a re-freeze can turn a light, fluffy snowpack into a dense, waterlogged slab that weighs two or three times as much per square metre. Add a second or third storm on top of that base layer and older roofs, additions, and flat sections start to feel real stress.
Beyond the structural concern, snow sitting on a warm roof deck melts from underneath, runs down toward the cold eaves, and re-freezes into an ice dam. That dam backs water up under the shingles and into the attic, soffits, and eventually the ceiling drywall. We see this pattern every year on homes throughout the Greater Toronto Area, and it is almost always preventable with timely, correct snow removal rather than waiting until water is already dripping indoors.
There is also a practical safety angle. Snow and ice sliding off a sloped roof can injure someone walking below, damage a parked vehicle, or crush shrubs and railings. Proactive roof snow removal protects the building and the people around it, which is why we treat it as a seasonal maintenance task rather than an emergency-only service.
Reading Your Roof: When Snow Actually Needs to Come Off
Not every snowfall requires action. A fresh 5-10 centimetres of light powder on a steep asphalt shingle roof usually slides or sublimates on its own within a few days, and repeatedly climbing up for a small amount of snow creates more risk than it prevents. The situations that genuinely call for removal include:
- Accumulation exceeding roughly 60 centimetres of fresh snow, or 15-20 centimetres of dense, wet snow
- Visible icicles longer than 30 centimetres forming along the eaves, a strong sign an ice dam is developing
- Interior signs of trouble — water stains on ceilings, damp attic insulation, or ice visible through soffit vents
- Flat or low-slope sections (common on additions, garages, and bay window roofs) where snow does not shed naturally at all
- Older roofs, roofs with known roof repair history, or structures already flagged during a prior inspection
If you are unsure whether your roof qualifies, a quick look from the ground with binoculars, checking your attic for frost or damp rafters, and comparing snow depth against your eavestrough line will usually answer the question. When in doubt, it costs far less to have a professional take a look than to repair water damage after the fact.
Technique 1: The Roof Rake (Ground-Level, Lower Risk)
For most sloped residential roofs, a roof rake — a flat aluminum or plastic blade on a long telescoping pole — is the safest first line of defence, because it lets a homeowner clear the bottom 1.2 to 1.8 metres of roof edge without ever leaving the ground. That lower section is exactly where ice dams form, so clearing it interrupts the freeze-thaw cycle before it starts.
| Roof Rake Type | Best For | Typical Cost (CAD) | Notes |
|---|---|---|---|
| Basic aluminum rake, 4.5 m pole | Bungalows, single-storey additions | $60 – $90 | Lightweight; can flex on wet, heavy snow |
| Poly-blade rake with wheels | Asphalt shingle roofs | $100 – $150 | Wheels reduce shingle granule wear |
| Telescoping rake, 6-7.5 m reach | Two-storey homes | $150 – $220 | Heavier; requires two-handed control |
| Roof rake with ice-dam blade attachment | Homes with recurring ice dams | $180 – $260 | Best paired with periodic professional steam removal |
The technique itself is straightforward but easy to get wrong. Stand well back from the building, angle the blade so it sits flat against the shingles (not digging in), and pull snow down and toward you in narrow strips rather than trying to clear a wide swath in one pass. Never pull straight down on a loaded rake with your body directly underneath the falling snow — angle to the side. Stop as soon as you reach shingle granules or ice; scraping bare shingles removes the protective granule layer and shortens the roof’s life.
Roof rakes work well for asphalt shingles and most metal roofing, but they are not appropriate for slate, clay tile, or wood shake, where the blade can crack or lift individual pieces. If your home has any of those materials, or if you are unsure what is on your roof, it is worth a quick call before you start raking.
Technique 2: Manual Shovelling and Roof-Safe Tools
For flat and low-slope roofs — common on additions, garages, porches, and full flat roof sections — a roof rake cannot reach the middle of the surface, so removal often means someone physically walking on the roof with a plastic (never metal) shovel. This is where technique and safety equipment matter most.
We only send crews up for this work with full fall-protection harnesses, anchored safety ropes, and non-slip footwear, because a snow-covered flat roof hides slippery membrane, skylight curbs, and roof drains that are easy to step on or into without realizing it. Homeowners attempting this themselves should think twice; the fall risk on an icy roof significantly outweighs the benefit of a DIY save.
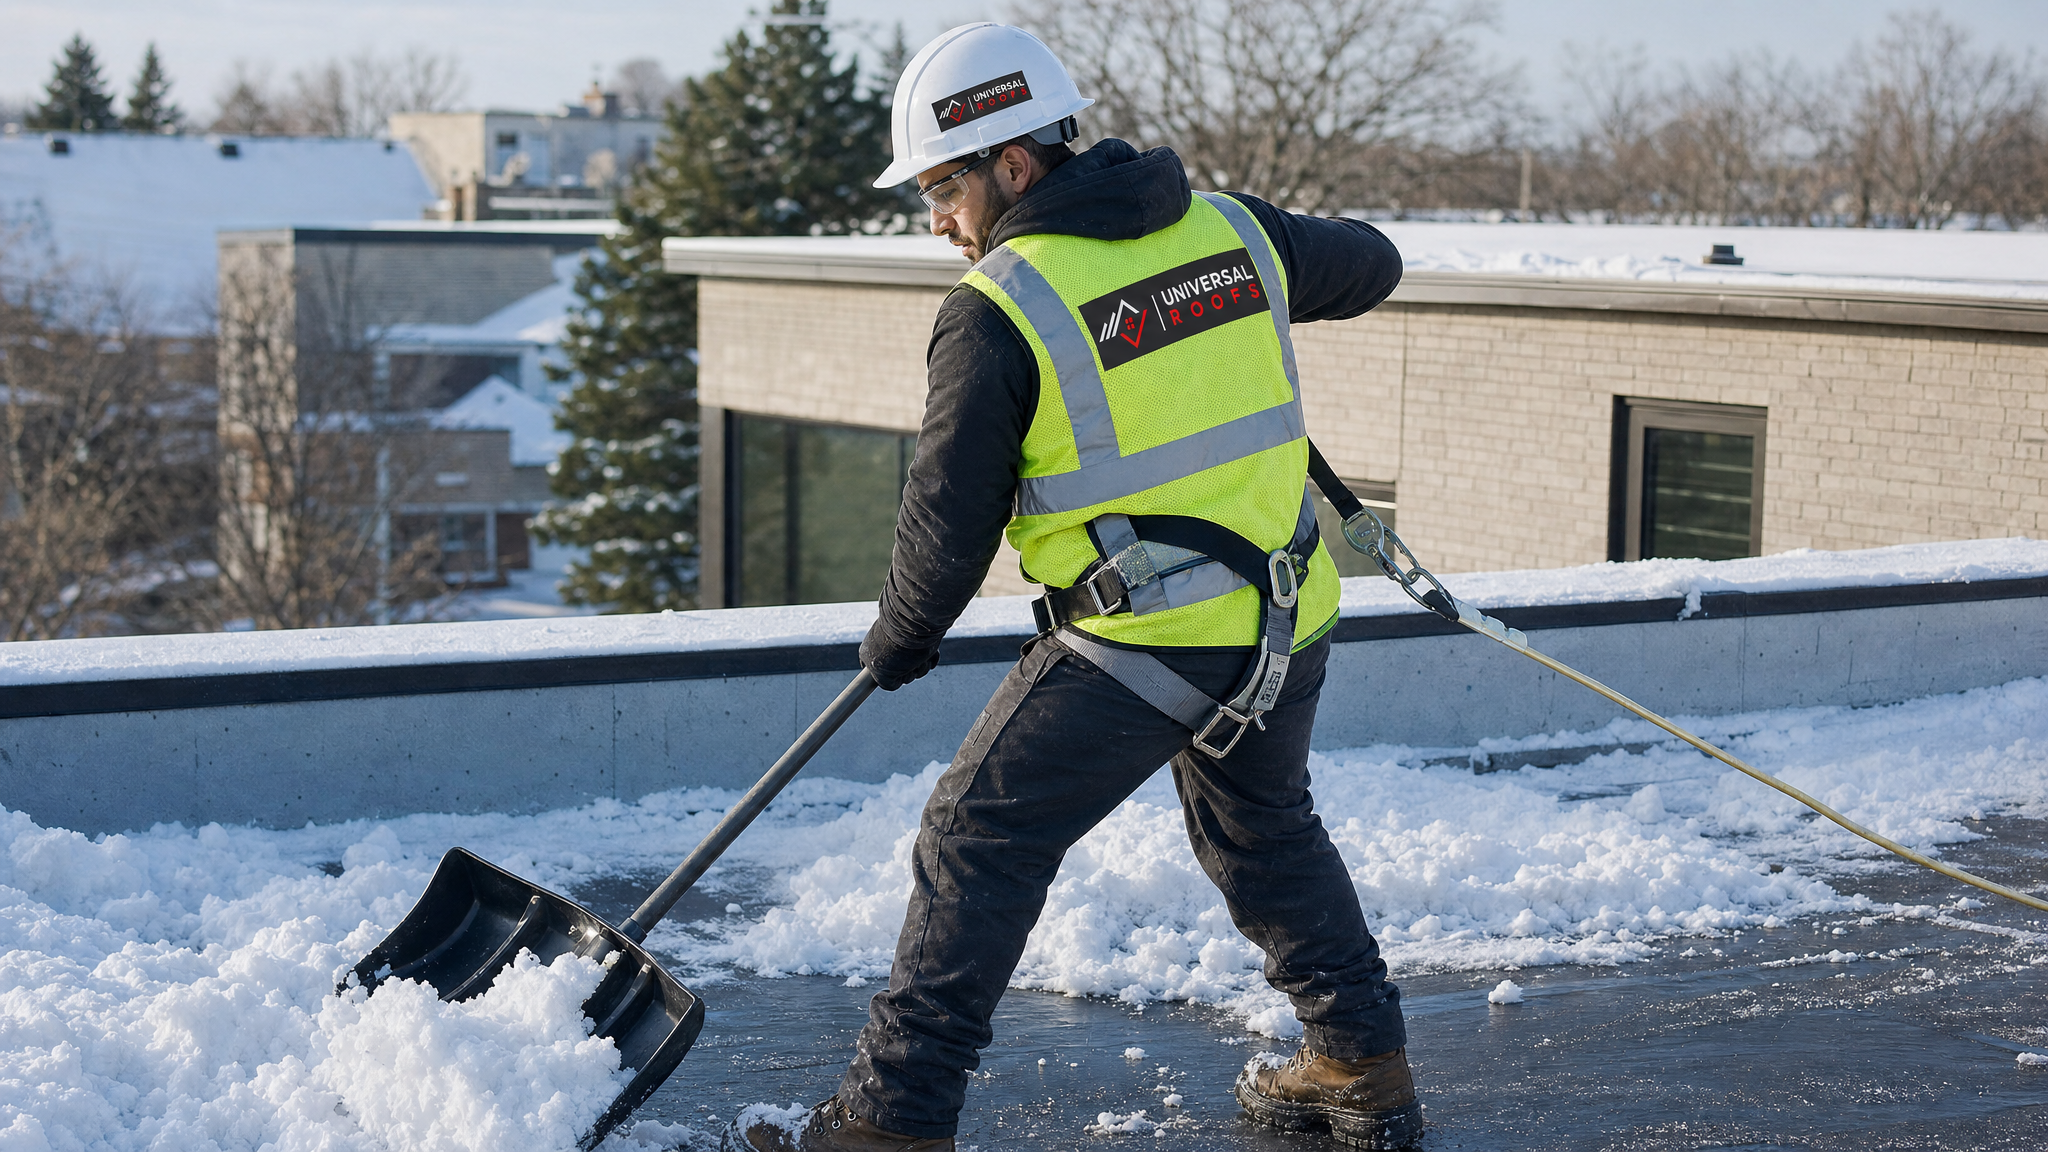
When we do shovel a flat roof, we leave a thin buffer layer of snow (2-3 centimetres) directly on the membrane rather than scraping down to bare material — this protects the surface from the shovel edge and from foot traffic. We also work systematically from the roof drains outward, keeping the drains and scuppers clear at all times so meltwater has somewhere to go instead of pooling. Pooled meltwater on a flat roof is one of the most common causes of interior leaks we get called out for in late winter.
Technique 3: Steam and Hot-Water Ice Dam Removal
Once an ice dam has already formed, raking or shovelling the snow above it does nothing to solve the actual blockage — the ice itself needs to be melted or carefully cut away. This is where low-pressure steam systems come in, and it is the method we rely on most for established ice dams along eavestroughs and valleys.
A steam system heats water to produce low-pressure steam that is applied directly to the ice through a wand, melting a channel through the dam without the force needed for chipping or chiselling. Because the steam melts rather than impacts the surface, it does not damage shingle granules, flashing, or gutters the way a hammer, axe, or pressure washer would.
| Ice Dam Method | Effectiveness | Risk to Roof | Recommended? |
|---|---|---|---|
| Low-pressure steam | High — melts through cleanly | Very low | Yes, our preferred method |
| Calcium chloride ice melt in a sock/tube | Moderate, slower acting | Low, if used sparingly | Yes, as a temporary DIY measure |
| Chipping with a hammer or axe | High but crude | Severe — cracks shingles, dents flashing | No, never recommended |
| Pressure washer (hot or cold) | Moderate | High — forces water under shingles | No |
| Rock salt spread directly on roof | Low to moderate | Moderate — corrodes metal flashing and gutters | No |
If you want a stopgap before a crew arrives, a calcium chloride ice-melt sock (a nylon stocking or mesh tube filled with ice melt, laid perpendicular across the dam) can open a small channel for water to escape. It is not a permanent fix, but it buys time and is far safer than chipping. Rock salt spread loosely on the roof should be avoided — it runs off into gutters and downspouts and accelerates corrosion on metal components over several seasons.
What NOT to Do: Common Mistakes That Cause More Damage
Every winter we repair roofs that were damaged not by the storm itself, but by an attempted DIY snow removal that went wrong. The most frequent issues we see:
- Using a metal shovel or ice pick directly on shingles or membrane — this gouges the surface and creates a leak point that often is not discovered until spring
- Climbing onto a snow-covered roof without fall protection — snow hides the true slope and slipperiness underneath, and most residential ladders are not rated for the added weight of a person carrying tools
- Chipping at ice dams — this is the single most common cause of cracked shingles and dented flashing that we see in January and February service calls
- Removing all the snow down to bare shingle — a thin protective layer left behind reduces the chance of granule loss
- Ignoring attic ventilation — if your attic is poorly insulated or ventilated, warm air escaping into the roof deck will keep re-melting snow and rebuilding the ice dam no matter how many times you clear it
That last point is worth dwelling on. Snow removal treats the symptom; attic ventilation and insulation treat the cause. If a home develops the same ice dam in the same spot every winter, the long-term fix usually involves sealing air leaks and improving ventilation, not just repeating the same snow removal every storm.
Roof Type Matters: Matching the Technique to the Material
The right snow removal approach changes significantly depending on what is actually on your roof. Asphalt shingles tolerate a plastic roof rake reasonably well. Metal roofing sheds snow on its own in most cases and rarely needs raking at all, though ice can still build at the eaves. Slate, clay tile, and cedar shake are far more fragile and are best left to a professional who knows how much pressure each material can take.
| Roof Material | Recommended Method | Avoid |
|---|---|---|
| Asphalt shingles | Roof rake (angled), steam for ice dams | Metal shovels, chipping, pressure washers |
| Metal roofing/panels | Usually self-clearing; steam for eave ice | Salt (corrosion), sharp tools that scratch coating |
| Flat/low-slope membrane | Plastic shovel leaving buffer layer, keep drains clear | Metal tools, walking directly on drains/scuppers |
| Slate or clay tile | Professional hand-clearing only | Roof rakes (can crack tiles), any foot traffic |
| Cedar/wood shake | Light hand-clearing, professional steam for ice | Metal tools, aggressive raking |
If your roof includes a skylight, extra care is needed around the curb and flashing, since snow tends to accumulate against the upslope side and ice can wedge under the flashing seal. A properly installed or recently updated skylight (see our skylight replacement options) with modern flashing handles this far better than an older unit.
DIY vs. Professional Roof Snow Removal: A Cost and Timeline Comparison
Many GTA homeowners handle light snow themselves with a roof rake and call in professionals only for ice dams or steep/complex roofs. Here is how the options generally compare:
| Approach | Typical Cost (CAD) | Time to Complete | Best Suited To |
|---|---|---|---|
| DIY roof rake (ground level) | $60-$260 one-time tool purchase | 20-45 minutes per storm | Single-storey homes, fresh light snow |
| DIY ice-melt sock | $15-$30 in materials | Sets up in 10 minutes; works over hours | Small, early-stage ice dams |
| Professional snow-load removal (walk-on roof) | $300-$700 per visit, size-dependent | 1-3 hours per visit | Flat roofs, heavy accumulation, two+ storeys |
| Professional steam ice-dam removal | $400-$900 per visit | 2-4 hours depending on dam size | Established ice dams, recurring problem areas |
| Seasonal snow removal contract | $800-$1,500 per winter (2-4 visits) | Scheduled proactively | Homeowners who want to avoid emergency calls |
These figures vary with roof size, pitch, accessibility, and how much ice has already built up, but they give a realistic starting point for budgeting. In our experience, homeowners who schedule two or three proactive visits per winter spend less overall than those who wait for an emergency ice-dam call in late February, simply because early intervention takes less labour and prevents interior water damage that turns into a much larger bill.
Preventing Ice Dams Before They Start
Snow removal is reactive by nature — it deals with what has already fallen. The more durable solution is reducing how much ice dams form in the first place, which comes down to keeping your roof deck cold and your attic properly ventilated so heat is not escaping upward and melting the underside of the snowpack.
- Add or top up attic insulation to current code levels, particularly around the attic hatch and recessed lighting, where warm air commonly escapes
- Confirm soffit and ridge vents are clear and functioning so cold outside air can flow beneath the roof deck
- Seal bypasses around plumbing stacks, bathroom fans, and chimneys before they reach the attic
- Install ice-and-water shield membrane at the eaves and valleys during your next roof replacement, extending it at least 90 centimetres past the interior wall line
- Keep eavestroughs and downspouts clear of leaves and debris in the fall so melting snow has a clear path off the roof
These upgrades pay for themselves over a few winters by reducing both the frequency of emergency snow removal calls and the risk of the water damage that comes with a neglected ice dam. We cover attic ventilation strategy in more depth if you want to dig into the mechanics further.
How Our Team Handles Roof Snow Removal
Every call starts with a quick assessment — roof pitch, material, accumulation depth, and whether an ice dam is already present — because that determines which crew and equipment we send. For straightforward rake-and-clear jobs on asphalt shingle roofs, a two-person crew can typically finish in under an hour. For established ice dams or flat roof accumulation, we bring low-pressure steam equipment and a fully harnessed crew, and we always check attic ventilation while we are up there so we can flag any underlying cause rather than just treating the visible snow.
We serve homeowners throughout Toronto, the Peel Region, York Region, Halton Region, and Durham Region, and our crews are equipped to handle everything from a single-storey bungalow to a multi-unit flat roof with several skylights and valleys. You can read what past clients have said about our winter service on our reviews page, and we have answered more seasonal questions on our FAQ page if you want additional detail before booking.
How much snow on a roof is too much?
Is it safe to remove snow from my roof myself?
What is the best tool for roof snow removal?
Why do ice dams keep forming in the same spot every winter?
Can roof snow removal damage my shingles?
How often should I schedule professional roof snow removal in the GTA?
Need Help With What Are the Best?
Whether you are dealing with a fresh snowfall, an established ice dam, or a flat roof section that never sheds snow on its own, getting the technique right protects both your roof and your home’s interior. Universal Roofs has handled winter roof maintenance across the GTA for two decades, and we know exactly which method fits which roof.
Call us today at (416) 732-2421 or request a free inspection to get started.
Universal Roofs proudly serves Toronto, Mississauga, Brampton, Vaughan, Markham, Oakville and the GTA since 2005.