
A summer thunderstorm rips a shingle loose. A sudden hailstorm cracks a vent boot. A branch punches a hole through your roof deck during a windstorm. When water starts dripping into your attic or ceiling, you need a plan in minutes, not days. Knowing the best temporary emergency roof repair options can mean the difference between a manageable inconvenience and thousands of dollars in interior water damage.
This guide walks through ten proven stopgap methods that homeowners across the Greater Toronto Area can use to slow or stop active leaks until a licensed roofer can make a permanent repair. We will cover what each method involves, when it works best, what tools and materials you need, and the safety limits every homeowner should respect. None of these methods replace a proper repair — they buy you time and protect your home while you arrange professional help through roof repair services.
Toronto’s climate makes emergency roof situations more common than many homeowners expect. Freeze-thaw cycles in shoulder seasons, summer microbursts, and heavy ice accumulation in winter all stress roofing materials in ways that lead to sudden failures. Having a plan before disaster strikes is one of the smartest things a homeowner can do.
Assess the Situation Safely Before You Do Anything
Before reaching for a tarp or a caulking gun, the first step in any emergency roof situation is a proper risk assessment. Roofs are dangerous, especially during or right after a storm when surfaces are wet, winds are still gusting, or debris is scattered across the slope. Many homeowners make the mistake of climbing onto a wet roof in the middle of a storm — this is how serious falls happen.
Start by checking from the ground with binoculars or a zoom lens on your phone. Look for missing shingles, visible daylight through the roof deck (from inside the attic), sagging areas, or debris lodged in the roofline. Inside the house, check ceilings and walls for water stains, bubbling paint, or active drips. If you can see the sky from inside your attic, that is a clear sign of a structural breach that needs immediate attention.
Never attempt any temporary repair if lightning is still active, winds exceed 30 km/h, the roof pitch is steep (anything over a 6:12 slope), or the roof surface is icy or wet enough to be slippery. In those conditions, the safest emergency measure is interior damage control — buckets, tarps over furniture, and moving valuables — while you wait for conditions to improve or a professional crew to arrive. A licensed Universal Roofs technician has the harnesses, anchor points, and experience to work safely in conditions that would be dangerous for an untrained homeowner.
Interior Damage Control: Your First Line of Defence
Before you even think about the exterior, stop water from spreading inside your home. This is the fastest, lowest-risk action any homeowner can take and it should happen within the first few minutes of noticing a leak.
Place a bucket or large container directly under the drip. If water is pooling on the ceiling drywall (a visible bulge), puncture the centre of the bulge with a screwdriver to release the water in a controlled way — this prevents a much larger, uncontrolled ceiling collapse. Move furniture, electronics, and belongings away from the affected area. Lay down towels or tarps to protect flooring. If the leak is near an electrical fixture or outlet, shut off power to that circuit at the breaker panel before doing anything else, since water and electricity are a serious combination.
Document everything with photos and video before you touch anything — timestamped images of the ceiling stain, the bucket catching water, and any visible exterior damage will support your insurance claim. Most home insurance policies in Ontario cover sudden and accidental water damage from storms, but they expect homeowners to take “reasonable steps” to mitigate further damage, which is exactly what these interior measures accomplish.
The 10 Best Temporary Emergency Roof Repair Options
Once the interior is under control and it is safe to inspect the roof (either from the ground or, if conditions genuinely allow it, from a securely footed ladder), these are the ten most effective temporary fixes homeowners can use.
1. Waterproof Tarping
A heavy-duty poly tarp is the single most versatile temporary emergency roof repair option. Choose a tarp rated at least 6 mil thick, and size it so it extends at least 1.2 metres past the damaged area on all sides and drapes over the ridge line if possible. Secure it with wood strips (called “batten boards”) screwed through the tarp into the roof deck along the edges — never rely on rope or bungee cords alone, as wind will tear a loosely secured tarp free within hours. Anchor the top edge over the ridge and let gravity and overlapping shingles work with you rather than against you.
2. Roofing Cement and Trowel Patches
Plastic roofing cement, sometimes called flashing cement or mastic, is excellent for sealing small cracks, nail pops, and lifted shingle edges. Apply a generous, even layer with a putty knife or trowel, pressing it into the gap and feathering the edges so water sheds properly. It works on asphalt shingles, flashing seams, and vent boots, and it cures even in damp conditions, which makes it ideal for active-leak scenarios.
3. Self-Adhesive Roof Flashing Tape
Butyl or rubberized flashing tape sticks aggressively to most roofing surfaces, even slightly damp ones, and creates an instant waterproof seal. It is particularly effective on flashing joints, chimney bases, and skylight edges where a tarp is impractical. Clean the surface as best you can, press the tape firmly along the seam, and roll it with a hand roller or the back of a trowel for full adhesion.
4. Emergency Shingle Replacement
If only one or two shingles have blown off and you have matching spares on hand (many homeowners keep a bundle left over from the original install), a temporary shingle can be slid into place and tacked down with roofing nails and a dab of cement over the nail heads. This is a quick, clean fix that often holds until the next scheduled maintenance visit.
5. Plywood or OSB Deck Patches
When a branch or debris has punched through the roof deck itself, a tarp alone will sag into the hole. Screw a sheet of plywood or OSB over the breach first to restore a solid surface, then cover it with a tarp or self-adhesive membrane for waterproofing. This two-layer approach prevents the tarp from failing under wind load.
6. Sandbags and Weighted Tarp Anchors
In situations where screwing into the roof deck isn’t advisable (such as on a roof you don’t want additional penetrations in, or a flat roof), sandbags or weighted tubes placed along tarp edges and seams hold the material down without adding holes. This method works especially well on flat roofing systems where ponding water is also a concern.
7. Vent Boot and Pipe Collar Sealant
Rubber vent boots around plumbing stacks crack over time, especially with Toronto’s freeze-thaw cycles. A tube of polyurethane roof sealant applied around the base of the boot, filling any visible cracks, is a fast fix that can hold for weeks or months until a full boot replacement is scheduled.
8. Skylight Emergency Covers
A cracked or leaking skylight needs immediate attention because it is a direct opening in your roof deck. A plywood cover cut to size and screwed over the exterior frame, sealed at the edges with flashing tape, stops water intrusion completely until a proper skylight replacement can be scheduled. Interior plastic sheeting taped around the skylight well is a useful secondary measure to catch any residual moisture.
9. Gutter and Downspout Clearing
Sometimes what looks like a roof leak is actually water backing up because a gutter is clogged with debris, forcing it under the shingles at the eaves. Clearing gutters and downspouts, especially after a storm that brings down leaves and branches, is a genuinely effective “repair” that costs nothing but time and can immediately stop a leak that has nothing to do with the shingles themselves.
10. Attic-Side Moisture Barriers
When the exterior is too dangerous to access (steep pitch, ice, active storm), working from inside the attic is a valid interim option. Stapling heavy plastic sheeting to the underside of the rafters above the leak point, angled to direct water into a gutter or collection trough, keeps water off insulation and drywall until exterior access is safe.
| Temporary Repair | Best For | Typical Duration | DIY Difficulty |
|---|---|---|---|
| Waterproof tarping | Large missing sections, storm damage | 2-6 weeks | Moderate |
| Roofing cement patch | Small cracks, nail pops | 3-6 months | Easy |
| Flashing tape | Seams, chimney bases, skylight edges | 1-3 months | Easy |
| Emergency shingle swap | 1-2 missing shingles | Until next maintenance | Moderate |
| Plywood deck patch | Punctures through the deck | 4-8 weeks | Difficult |
| Sandbag anchors | Flat roofs, no-penetration needs | 1-4 weeks | Easy |
| Vent boot sealant | Cracked rubber pipe collars | 2-4 months | Easy |
| Skylight plywood cover | Cracked or broken skylight glazing | 1-3 weeks | Moderate |
| Gutter clearing | Water backing up at the eaves | Ongoing solution | Easy |
| Attic moisture barrier | Unsafe exterior access | Days to 1 week | Easy |
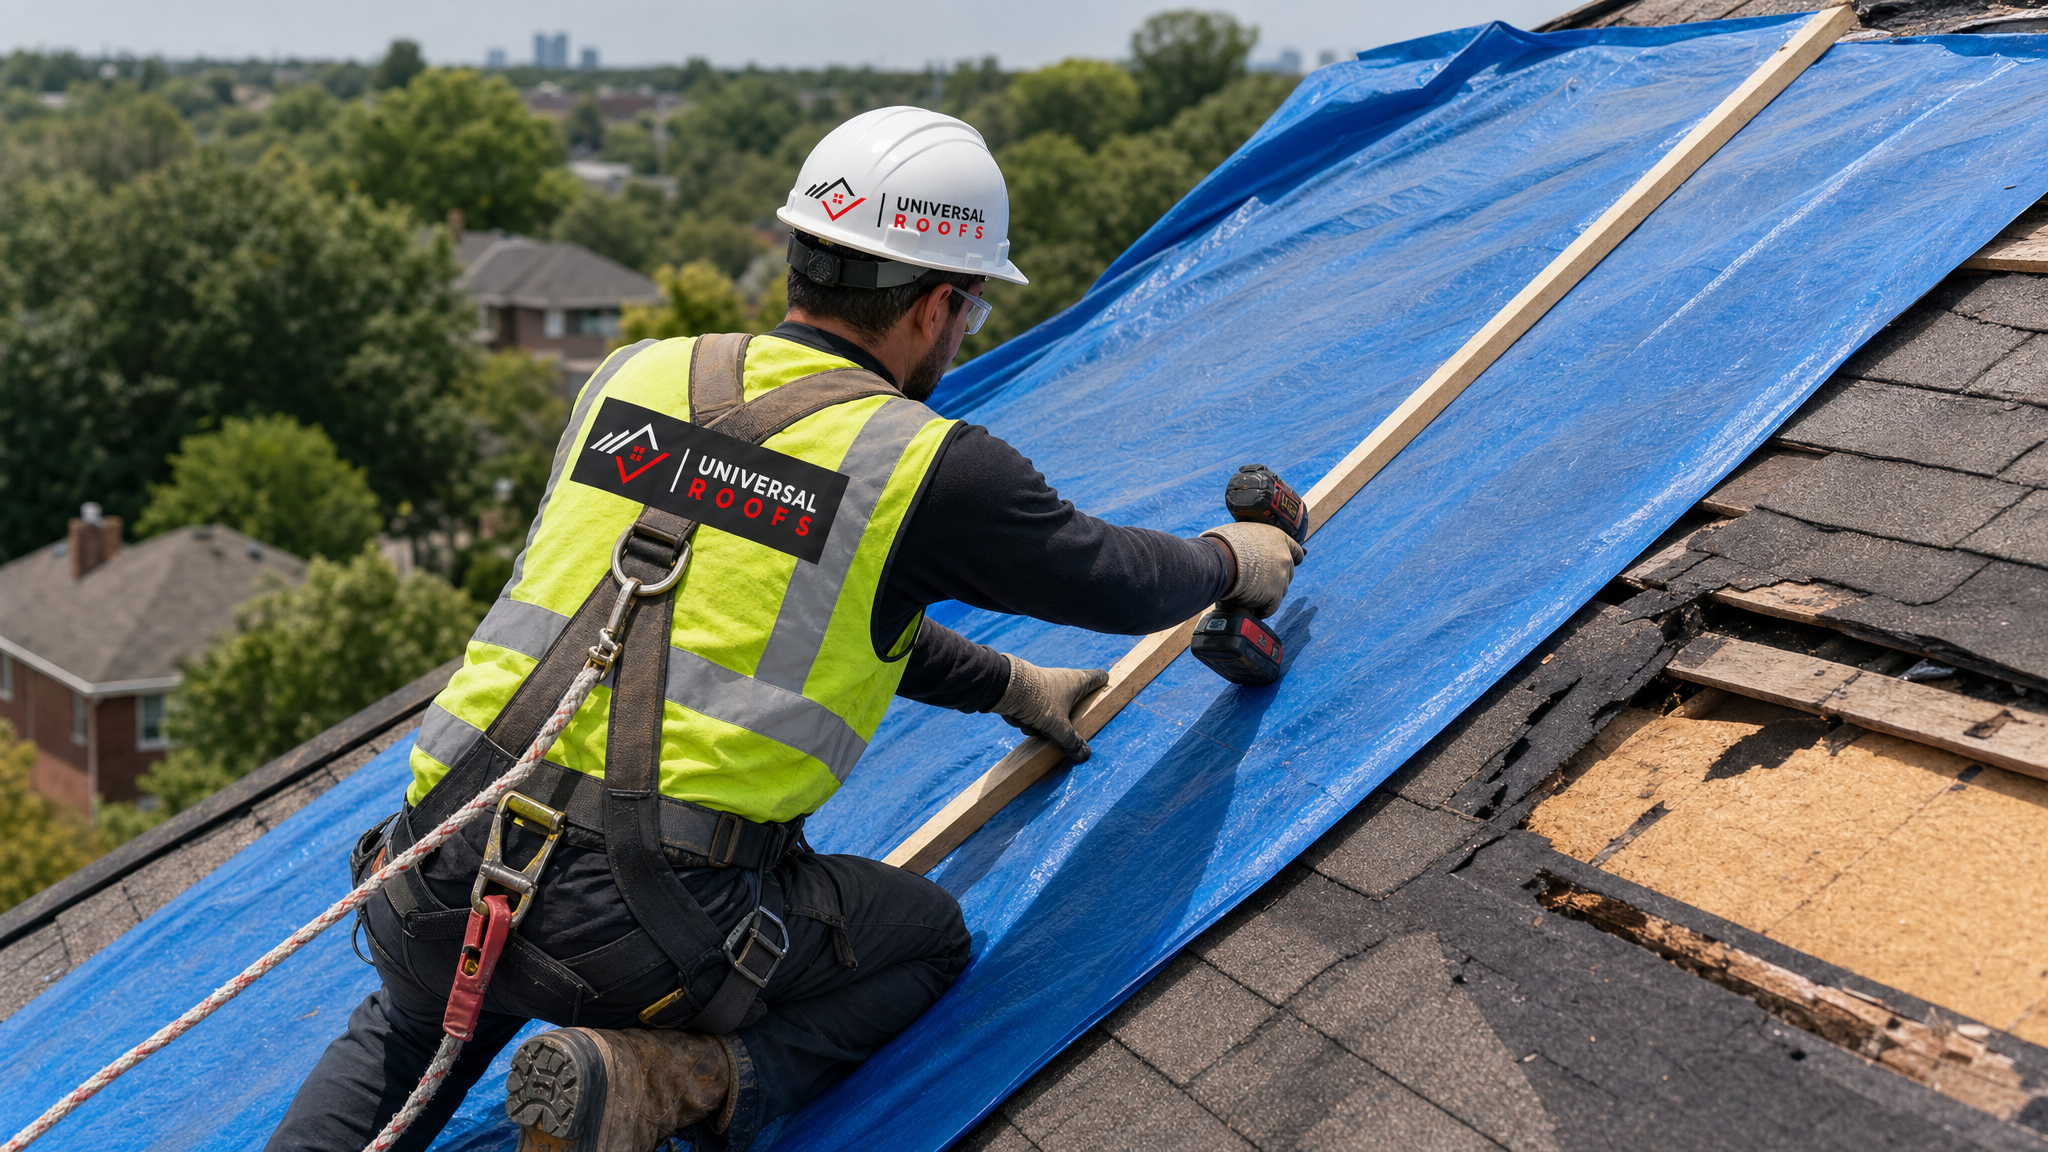
Step-by-Step: How to Install a Temporary Tarp Correctly
Since tarping is the most common and most versatile temporary fix, it deserves a detailed walkthrough. Doing it correctly the first time prevents wind from tearing the tarp loose and causing a second, worse leak.
- Measure the damaged area and select a tarp that extends at least 1.2 metres beyond the damage in every direction, including over the ridge line.
- Clear debris from the roof surface so the tarp lies flat without punctures from underlying sticks or shingle fragments.
- Roll the tarp out starting from the ridge and working down toward the eave, so any water that reaches the tarp flows over the top layer rather than under an edge.
- Wrap the top edge over the ridge and secure it on the opposite slope if possible — this anchors the tarp against uplift far better than fastening only on one side.
- Place 2×4 batten boards along each edge of the tarp and screw them through the tarp into the roof deck every 30-40 centimetres, being careful to hit solid framing where possible.
- Avoid direct nailing or screwing into open areas of the tarp itself away from batten boards, since isolated fasteners create new puncture points that will leak.
- Check the seal after the next rainfall and re-tighten any battens that have loosened.
Costs and Timelines for Temporary vs. Permanent Repairs
Many homeowners want to understand the trade-off between a quick DIY fix and calling in a professional right away. The table below breaks down typical costs and how long each option realistically holds up under GTA weather conditions.
| Repair Type | Approx. Material Cost | Time to Complete | Reliability |
|---|---|---|---|
| DIY tarp only | $40 – $120 | 30-90 minutes | Moderate, needs monitoring |
| DIY cement/tape patch | $15 – $50 | 15-30 minutes | Good for small areas only |
| Professional emergency tarp | $250 – $600 | 1-2 hours (same-day) | High, properly secured |
| Professional emergency patch repair | $300 – $900 | 1-3 hours | High, matched materials |
| Full permanent repair (follow-up) | Varies by scope | 1-2 days scheduled visit | Permanent solution |
A professional emergency call costs more upfront than a DIY tarp, but it also comes with proper safety equipment, correctly matched materials, and — critically — an assessment of whether there is hidden damage a homeowner would miss, such as saturated insulation, compromised decking, or secondary leak points. This is where a same-day emergency dispatch through roof repair services pays for itself by preventing a second emergency call a few weeks later.
When a Temporary Fix Isn’t Enough: Call a Professional Immediately
Some situations go beyond what any temporary measure can safely handle, and delaying professional help in these cases risks the structural integrity of the entire roof system, not just the damaged section.
- Visible sagging or bowing in the roof deck, which suggests structural damage to rafters or trusses
- Large sections of missing decking, not just shingles, exposing the attic directly to weather
- Damage near electrical service masts
- Chimney or masonry damage combined with roof damage, which can affect structural loads
- Repeated leaks in the same location after a temporary fix, indicating the underlying cause hasn’t been addressed
- Any damage on a roof steeper than most homeowners can safely access, regardless of the size of the problem
In any of these scenarios, the right move is to secure the interior as best you can, keep everyone away from the affected area, and call for a professional assessment right away rather than attempting an exterior fix yourself. A trained technician can also check your attic ventilation and insulation for water damage that isn’t visible from inside the living space.
Preventing the Next Emergency: Maintenance That Actually Matters
The best emergency repair is the one you never need. Regular maintenance dramatically reduces the odds of a sudden roof failure, particularly given how hard Toronto’s freeze-thaw cycles and summer storms are on aging roofing materials.
| Maintenance Task | Recommended Frequency | What It Prevents |
|---|---|---|
| Full roof inspection | Twice yearly (spring and fall) | Missed early-stage shingle or flashing wear |
| Gutter cleaning | Spring and late fall | Water backup under eaves and ice damming |
| Flashing and sealant check | Annually | Slow leaks around chimneys, vents, skylights |
| Attic ventilation check | Annually | Condensation damage and premature deck rot |
| Post-storm visual check | After any major wind or hail event | Undetected damage that worsens over time |
Homeowners who schedule a proactive inspection each spring and fall catch small issues — a lifted shingle tab, a hairline crack in flashing cement, a slightly worn vent boot — before they become emergencies. It is a far less stressful and less expensive way to manage a roof than reacting to a leak during a storm. If your roof is approaching or past its expected lifespan, it may also be worth discussing a full roof replacement rather than continuing to patch an ageing system repeatedly.
Common Mistakes Homeowners Make During Roof Emergencies
Even well-intentioned homeowners often make the situation worse during the panic of an active leak. Being aware of these common errors helps you avoid compounding the damage.
Climbing onto a wet or icy roof during or immediately after a storm is the most dangerous mistake, and it accounts for a significant share of fall injuries reported by Ontario emergency rooms each year. Using duct tape as a “waterproof” fix is another common error — it fails quickly when exposed to UV light and moisture, often within days. Ignoring a small drip because it seems minor is a mistake too, since water travels along rafters and can appear far from the actual point of entry, meaning small leaks left unaddressed often cause more spread-out damage than large ones that are dealt with promptly. Finally, many homeowners skip photographing the damage before starting repairs, which can complicate insurance claims later.
What is the fastest temporary emergency roof repair option for a sudden leak?
How long can a tarp safely stay on a roof before permanent repairs are needed?
Is it safe to do temporary emergency roof repairs myself?
Will my home insurance cover emergency roof repair costs?
What temporary roof repair option works best for a flat roof leak?
When should I stop trying a temporary fix and call a professional roofer?
Need Help With 10 Best Temporary Emergency?
No temporary fix lasts forever, and the sooner a proper repair is made, the less likely small damage is to spread into a costly problem. The team at Universal Roofs has been helping homeowners across the GTA stabilize storm damage and complete lasting repairs since 2005.
Call us today at (416) 732-2421 or request a free inspection to get started.
Universal Roofs proudly serves Toronto, Mississauga, Brampton, Vaughan, Markham, Oakville and the GTA since 2005.