
If you have ever noticed a brown stain spreading across your ceiling near the fireplace, or watched water bead up along the inside frame of a skylight after a summer storm, you already know that chimneys and skylights are the two most common places a roof starts to fail. Both are penetrations through an otherwise continuous roofing membrane, and both rely almost entirely on flashing and sealant to keep water out. When that flashing ages, cracks, or was installed incorrectly in the first place, water finds its way in — sometimes slowly, over months, before it ever shows up as a visible stain.
At Universal Roofs, we have been repairing and waterproofing chimneys and skylights across the Greater Toronto Area since 2005. Toronto’s climate is particularly hard on these details: freeze-thaw cycles in winter expand and contract metal flashing and roofing cement, while intense summer UV exposure dries out rubber gaskets and sealants faster than in milder climates. This guide walks through the four best, most reliable ways to waterproof a chimney or skylight, what each method actually involves, how long it lasts, and how to tell which approach your roof needs.
Whether you are dealing with an active leak right now or you are being proactive after noticing some wear during a summer roof inspection, understanding these four methods will help you have a more informed conversation with any roofing contractor — including us.
Why Chimneys and Skylights Leak More Than the Rest of the Roof
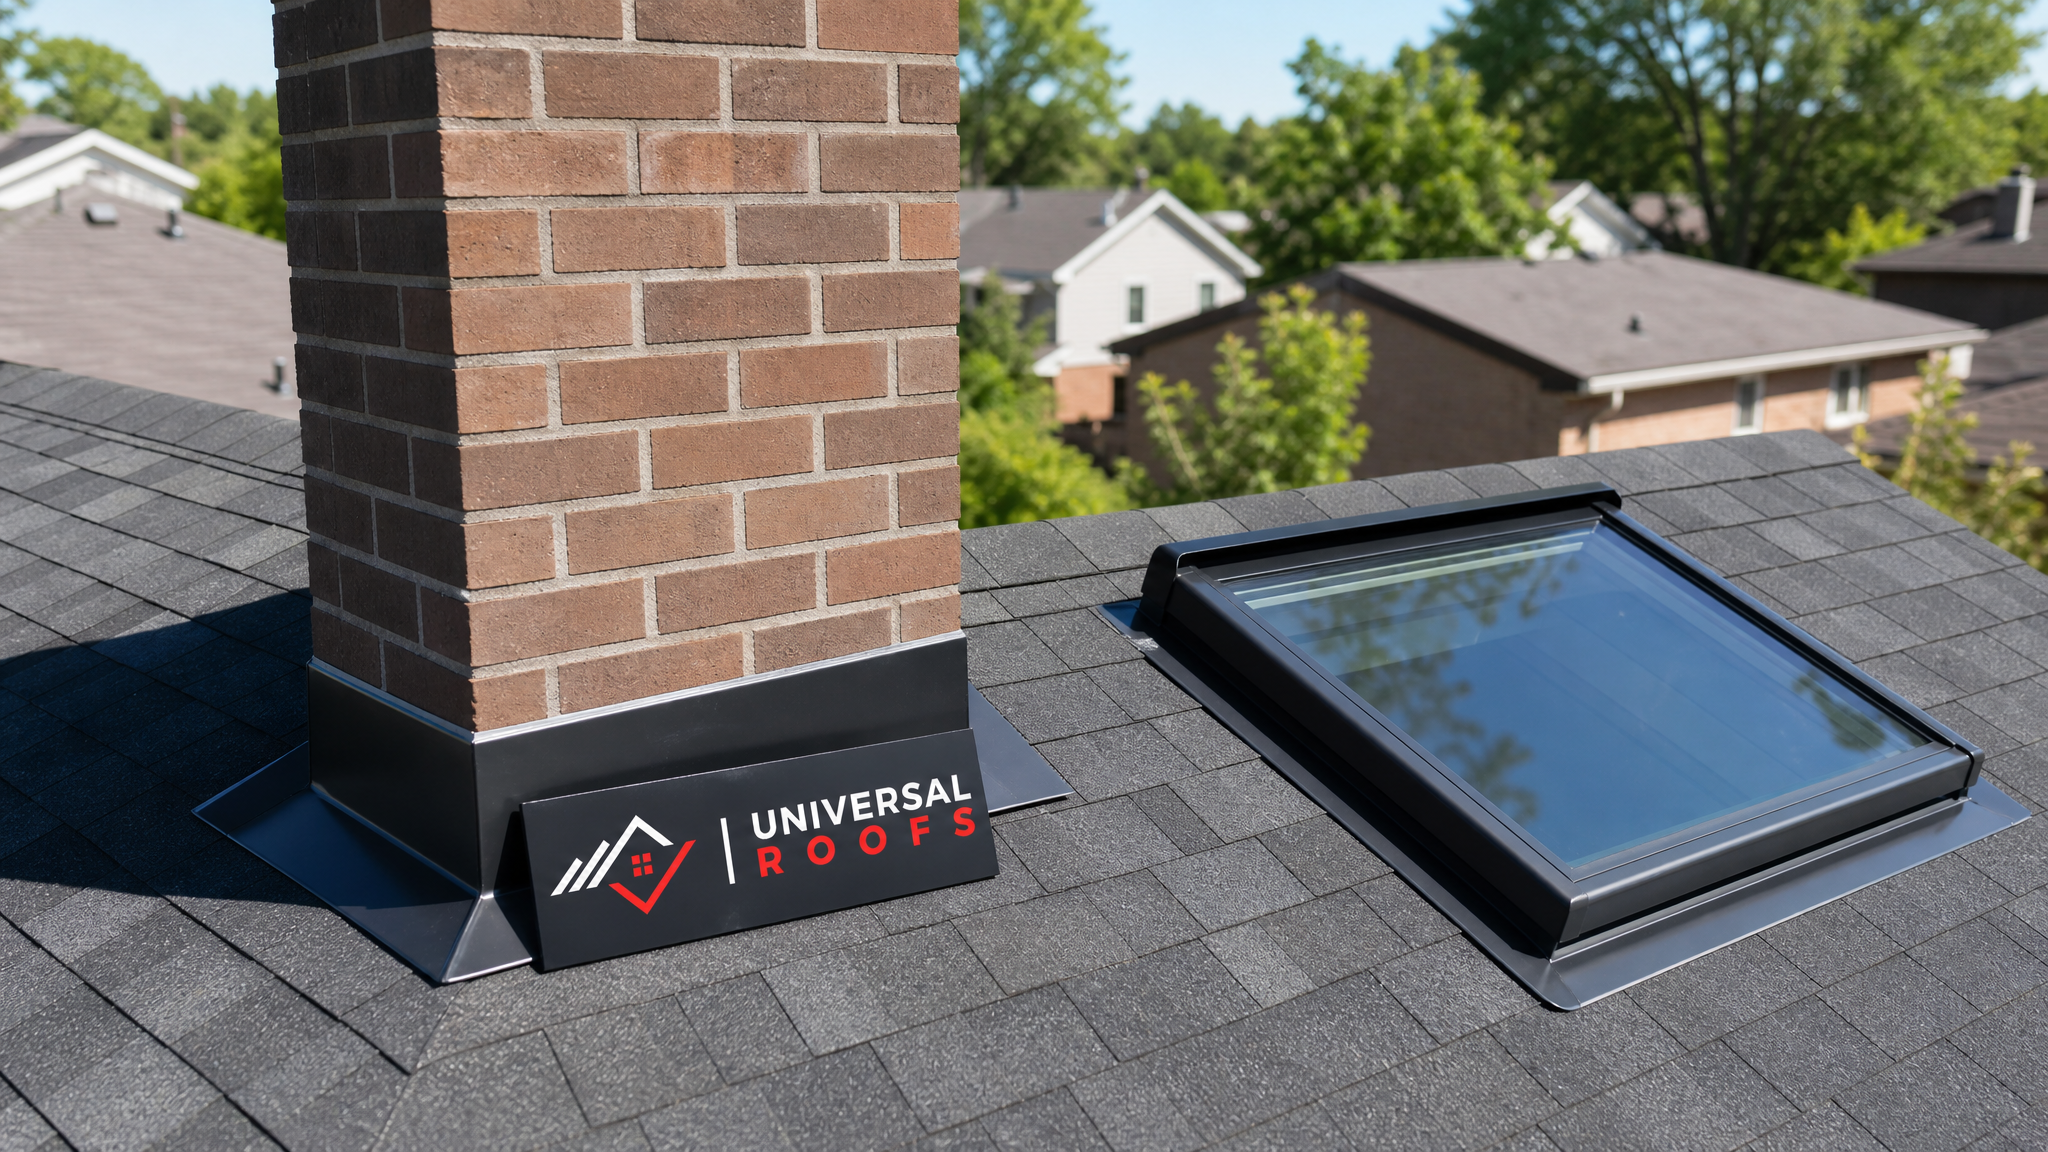
Every roof penetration — anything that punches a hole through the shingles, whether it’s a chimney, skylight, vent pipe, or dormer — is a weak point by design. The shingles themselves are excellent at shedding water when they are laid in an unbroken field, but the moment you interrupt that field with a masonry chimney or a glass skylight unit, you need a separate waterproofing system layered on top of the roofing material to bridge the gap. That system is the flashing, the underlayment, and the sealant working together.
Chimneys are especially vulnerable because they combine two very different materials — brick or stone masonry and the surrounding roof deck — that expand and contract at different rates. Add in the mortar joints on the chimney crown, which are porous and absorb water like a sponge, and you have multiple potential failure points in a single structure. Skylights, meanwhile, are essentially a manufactured box sitting inside a hole cut into your roof deck, held watertight only by the quality of the flashing kit and the seal around the glazing unit itself.
In our experience serving homeowners across Toronto, Peel Region, York Region, and Halton Region, the vast majority of “mystery leaks” homeowners call about trace back to one of these two features, not the open field of shingles.
| Leak Source | Typical Cause | Warning Signs | Urgency |
|---|---|---|---|
| Chimney step flashing | Rusted, lifted, or improperly overlapped metal flashing at the roofline | Ceiling stains near the chimney, damp attic insulation | High — repair within weeks |
| Chimney crown or mortar | Cracked concrete crown or eroded mortar joints absorbing rainwater | White mineral staining on brick (efflorescence), crumbling mortar | Medium — repair before winter |
| Skylight flashing kit | Worn or incorrectly installed step and counter-flashing around the curb | Water tracking down the interior frame during rain | High — repair within weeks |
| Skylight glazing seal | Degraded rubber gasket or failed seal between glass and frame | Fogging between panes, drips directly from the glass edge | Medium to high depending on severity |
| Chimney cap | Missing or damaged cap allowing rain directly down the flue | Sooty water stains inside the firebox, musty odour | Medium — repair before rainy season |
Method 1: Step Flashing and Counter-Flashing Replacement
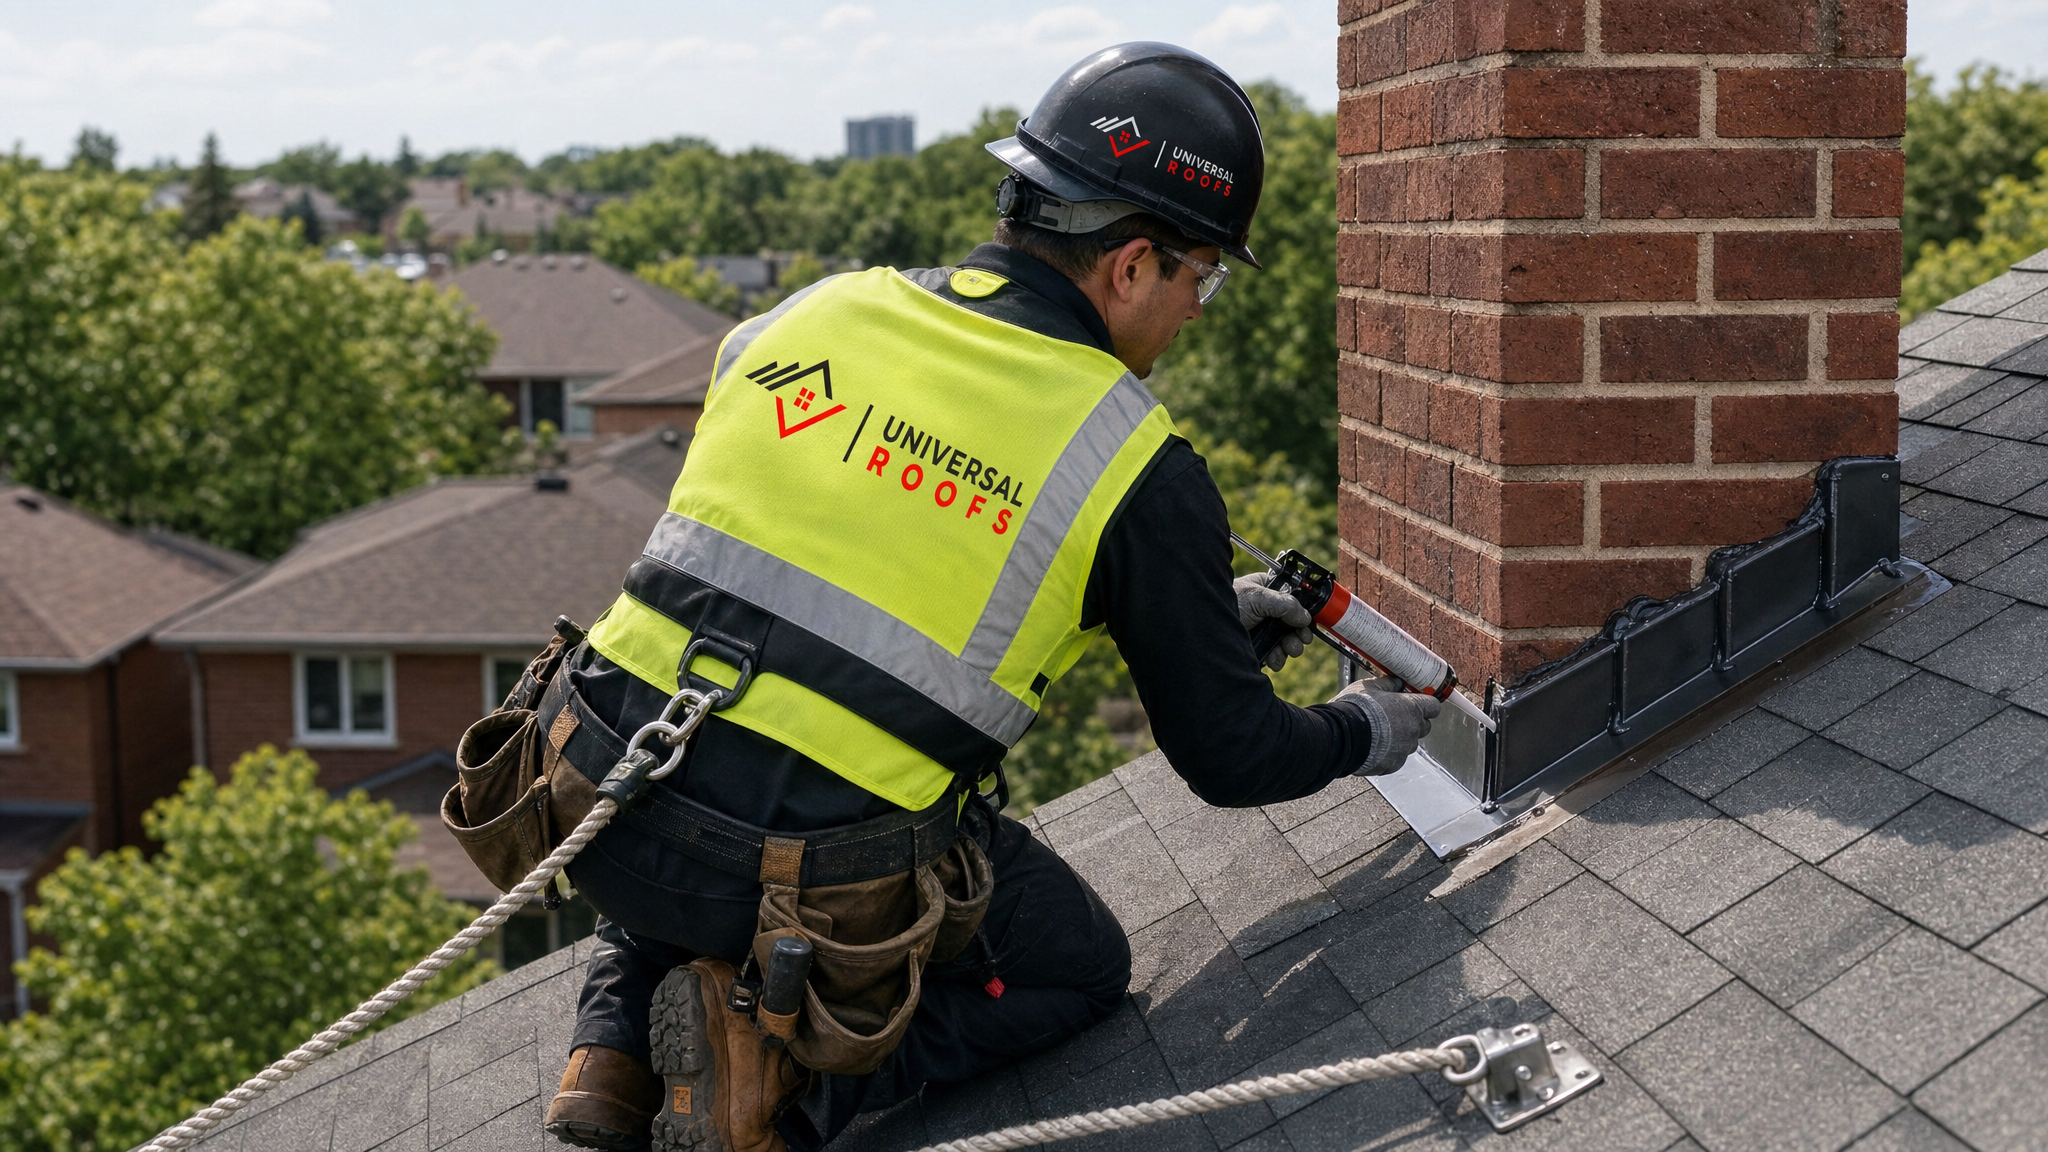
The single most important waterproofing method for both chimneys and skylights is proper flashing — and when we say “flashing,” we actually mean two separate components working together. Step flashing consists of small L-shaped metal pieces woven between each course of shingles along the sides of the chimney or skylight curb, directing water down and away from the penetration. Counter-flashing is then set into the mortar joints of the chimney (or under the skylight’s frame) and folded down over the top of the step flashing, creating a two-layer barrier that sheds water even as the roof and the masonry move independently of one another.
When this system fails, it is almost always because the original installation used a single continuous piece of flashing bent to fit (sometimes called “flashing cement only” installs), rather than properly stepped and counter-flashed metal. Continuous flashing cannot flex with seasonal movement and eventually pulls away or cracks. We also frequently find flashing that was simply caulked to the brick rather than embedded into a cut mortar joint called a reglet — caulk alone degrades within a few years under Toronto’s freeze-thaw cycles and UV exposure.
A correct roof repair replaces the step flashing entirely, cuts a proper reglet into the mortar for the counter-flashing, and uses corrosion-resistant materials (typically aluminum or galvanized steel, sometimes copper on higher-end homes) sized appropriately for the chimney width. This is genuinely the gold standard because it does not rely on any sealant as the primary waterproofing layer — sealant becomes a secondary, supplementary barrier rather than the only thing standing between your attic and the rain.
Method 2: High-Grade Sealant and Roofing Cement Systems
Sealant gets a bad reputation among experienced roofers because it is so often misused as a standalone fix rather than a supporting layer. Used correctly, though, sealant and roofing cement are an essential part of a durable waterproofing system, particularly at transition points that flashing alone cannot fully cover: the top edge of counter-flashing where it meets mortar, the corners of a skylight curb where step flashing pieces overlap, and the seams of a chimney cap.
Not all sealants perform the same in our climate. Ordinary silicone caulk, the kind sold in most hardware stores, becomes brittle and shrinks within two to four years when exposed to direct summer sun and winter freeze-thaw cycling — exactly the conditions a Toronto roof faces every year. Polyurethane-based roofing sealants and butyl rubber tapes hold up considerably longer because they stay flexible across a wider temperature range and adhere better to both metal and masonry.
For chimney crowns specifically, we often recommend an elastomeric waterproof coating rather than a simple sealant. This is a flexible, paint-applied membrane that bridges hairline cracks in the concrete crown and prevents rainwater from penetrating the porous surface, without the higher cost of a full crown rebuild. It is one of the more cost-effective preventative steps a homeowner can take, especially on chimneys with visible surface cracking but no structural damage yet.
| Sealant Type | Best Used For | Expected Lifespan | Relative Cost |
|---|---|---|---|
| Silicone caulk | Minor touch-ups, indoor trim (not primary roof defence) | 2-4 years outdoors | $ |
| Polyurethane roofing sealant | Flashing seams, skylight frame edges | 8-12 years | $$ |
| Butyl rubber tape/sealant | Under-flashing bedding, high-movement joints | 10-15 years | $$ |
| Elastomeric crown coating | Chimney crown surface cracking | 7-10 years | $$ |
| Roofing cement (asphalt-based) | Emergency temporary patching only | 1-3 years | $ |
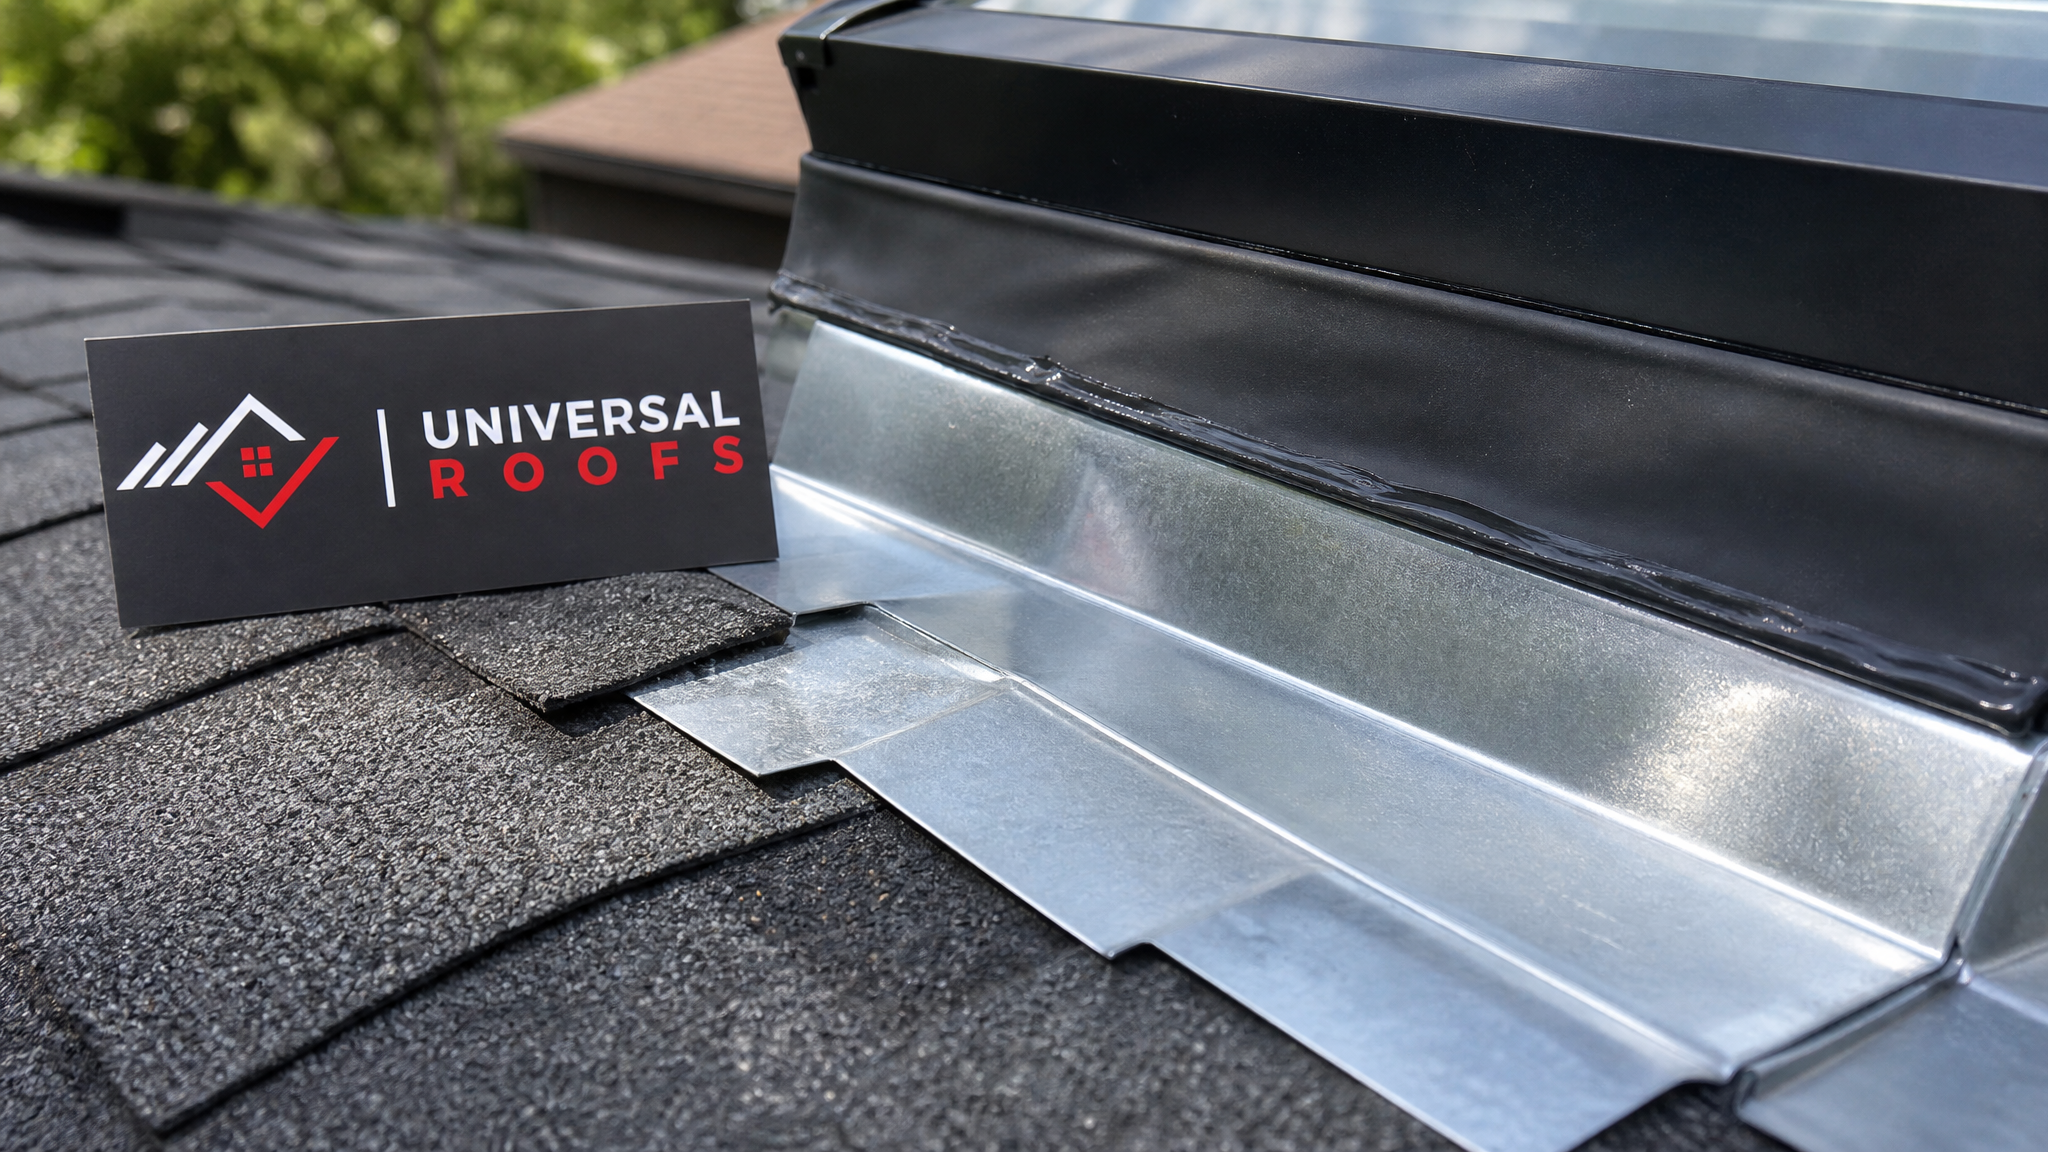
Method 3: Skylight-Specific Flashing Kits and Curb Waterproofing
Skylights deserve their own dedicated method because the failure points are somewhat different from a chimney. Most quality skylights sold today, whether fixed or venting, come with a manufacturer-designed flashing kit engineered specifically for that model and roof pitch. These kits include a self-adhering underlayment membrane that wraps the curb, step flashing pieces sized to the unit, and a head flashing piece at the top that diverts water around rather than into the frame. When a skylight leaks and it was installed with a generic or improvised flashing setup instead of the matched kit, the fix is rarely a simple caulk job — it typically requires removing the surrounding shingles and reinstalling the correct kit.
The curb itself, the raised wooden frame the skylight sits on, also needs to be wrapped in a self-adhering waterproof membrane (sometimes called ice-and-water shield) before the flashing goes on. This membrane seals around every screw and staple penetration, which is important because those small fastener holes are a surprisingly common leak source that flashing alone does not address.
If your skylight is older than 15 to 20 years, the glazing seal and the flashing have often both reached end of life around the same time, which is why we frequently recommend evaluating skylight replacement alongside a re-flash rather than repairing an aging unit twice. For homes that have never had a skylight but are considering one, proper installation from the outset using a matched flashing kit is far cheaper than retrofitting waterproofing after the fact — see our skylights page for details on the systems we install.
| Skylight Age | Typical Condition | Recommended Approach | Estimated Timeline |
|---|---|---|---|
| 0-10 years | Flashing and seals generally intact | Inspect annually, spot-seal as needed | Half-day inspection |
| 10-15 years | Flashing sealant beginning to degrade | Re-flash with new kit, retain glazing unit | 1 day |
| 15-20 years | Flashing and glazing seal both aging | Full re-flash plus glazing seal replacement | 1-2 days |
| 20+ years | Fogging, chronic leaks, degraded frame | Full skylight replacement | 1-2 days |
Method 4: Membrane Underlayment and Ice-and-Water Shield Around Penetrations
The fourth method is less visible than the other three but arguably just as important: the underlayment membrane installed beneath the shingles and flashing at every penetration. In Ontario, building code and industry best practice call for self-adhering ice-and-water shield membrane to extend a minimum distance around chimneys, skylights, and other roof penetrations, not just along the eaves where it is most commonly discussed. This rubberized asphalt membrane self-seals around nail penetrations, meaning even if a nail is driven directly through it during installation, the membrane closes back around the shank and stays watertight.
This is the layer that acts as a backup when the primary flashing and sealant layers eventually age or shift. We regularly find that older Toronto-area homes, particularly those built before ice-and-water shield became standard practice in the 1990s and 2000s, have only asphalt felt paper around their chimneys and skylights instead of a proper self-adhering membrane. When we perform a roof replacement or a significant repair around these penetrations, upgrading this hidden membrane layer is one of the highest-value additions we make, because it dramatically reduces the odds of a future leak even if the visible flashing or sealant is neglected for a few years.
For homes with flat or low-slope sections near a chimney, such as many additions and older Toronto rooflines, the waterproofing approach shifts slightly toward a fully adhered membrane system rather than shingle-and-flashing detailing. Our flat roofing team handles these transitions regularly, since a mixed-pitch roof with a chimney straddling both a sloped and flat section needs waterproofing details specific to each side.
How to Tell Which Waterproofing Method Your Roof Needs
Most homeowners cannot see chimney and skylight flashing up close from ground level, which is exactly why leaks around these features often go unnoticed until water has already reached the attic or ceiling. A few signs are worth watching for from inside your home: peeling paint or brown discoloration on ceilings near a fireplace wall, a musty smell in the attic after rain, or condensation-like moisture around the interior frame of a skylight that appears only during or after storms. From the ground, binoculars can sometimes reveal obviously lifted or rusted flashing, cracked chimney crowns, or gaps where flashing has visibly pulled away from brick.
Because these penetrations sit at height and often require close inspection to properly diagnose, we recommend a professional roof assessment rather than DIY troubleshooting, particularly given the fall risk involved in getting close enough to a chimney or skylight to inspect the flashing seams. Summer is genuinely one of the better windows for this kind of work in the GTA — dry weather and stable temperatures mean sealants cure properly and flashing repairs are not rushed ahead of an incoming storm, unlike emergency winter callouts.
| Symptom You Notice | Likely Method Needed | Do-It-Yourself Suitable? |
|---|---|---|
| Ceiling stain near chimney after rain | Step/counter-flashing replacement (Method 1) | No — requires roof access and diagnosis |
| Hairline cracks on chimney crown surface | Elastomeric coating (Method 2) | Not recommended — height and product matching |
| Water tracking down inside skylight frame | Skylight flashing kit replacement (Method 3) | No — requires shingle removal |
| Musty attic smell, no visible stain yet | Underlayment/membrane upgrade (Method 4) | No — hidden layer, needs inspection |
| Visible gap between flashing and brick | Step/counter-flashing replacement (Method 1) | Temporary sealant only, not a permanent fix |
Preventative Maintenance Between Repairs
Once a chimney or skylight has been properly waterproofed using the right combination of these four methods, ongoing maintenance is fairly light — but it does matter. We recommend a visual inspection twice a year, ideally in spring after the winter freeze-thaw season and again in late summer or early autumn before the fall rains pick up. During these checks, look for any new staining on interior ceilings, check that gutters and downspouts near the chimney are clear (overflowing gutters can force water back up under lower courses of flashing), and confirm that any exposed sealant beads have not cracked or pulled away from the surface.
Keeping the attic well-ventilated also plays a supporting role in protecting chimney and skylight flashing from the inside out. Excess heat and moisture trapped in an under-ventilated attic accelerates the deterioration of underlayment membranes and can cause condensation that mimics a roof leak. Our attic ventilation services are often recommended alongside chimney and skylight waterproofing work for exactly this reason — the two systems work together to protect the roof deck long-term.
If you are unsure whether your home’s chimney or skylight flashing was installed to current standards, checking with a local, experienced roofer beats waiting for a stain to appear. You can read what past customers across the GTA have said about our waterproofing and flashing work on our reviews page, and browse common questions on our FAQ page if you want more background before booking an assessment.
What are the best ways to waterproof chimneys and skylights?
How much does it cost to waterproof a chimney or skylight in Toronto?
Can I waterproof a chimney or skylight myself with caulk?
How do I know if my skylight or chimney flashing has failed?
Is summer a good time to waterproof a chimney or skylight in the GTA?
Do I need to replace my whole roof to fix a leaking chimney or skylight?
Need Help With 4 Best Ways to?
Chimney and skylight leaks rarely fix themselves, and the longer flashing or sealant problems go unaddressed, the more likely they are to cause hidden damage to your attic, insulation, and ceilings. Universal Roofs has spent nearly two decades diagnosing and repairing exactly these kinds of penetration leaks across the GTA, using proper flashing, membrane, and sealant systems rather than short-term patches.
Call us today at (416) 732-2421 or request a free inspection to get started.
Universal Roofs proudly serves Toronto, Mississauga, Brampton, Vaughan, Markham, Oakville and the GTA since 2005.