
If you have noticed a damp stain spreading across a ceiling near your chimney, or water dripping into your attic every time it rains, the culprit is very often flashing, not the shingles themselves. Flashing is the thin metal barrier installed at every roof joint, valley, and penetration to stop water from finding its way inside, and when it fails, small leaks can turn into major structural and mould problems in a hurry. This ultimate DIY roof flashing repair guide walks Toronto-area homeowners through exactly what flashing is, how to diagnose common failures, which materials and tools to use, and the step-by-step process for repairing the most common flashing problems safely.
We wrote this guide because flashing repair sits in an awkward middle ground. It is one of the few roofing tasks that a reasonably handy homeowner can sometimes tackle with the right tools and a healthy respect for ladder safety, yet it is also one of the most commonly botched repairs we see when we arrive for a service call. A flashing repair that looks fine from the ground can still leak for years if the laps, seals, or fasteners are not done correctly. Our goal here is to give you enough real, honest information to know when a DIY roof flashing repair is appropriate, how to do it properly if you decide to proceed, and when it is time to bring in Universal Roofs instead.
Summer is actually one of the better times of year in the Greater Toronto Area to inspect and repair flashing. The roof deck is dry, sealants cure properly in warm weather, and you are not fighting frost, ice, or a slippery surface the way you would in winter. If you have been putting off that flashing repair since the spring thaw revealed a leak, now is the window to get it done before autumn rains and winter’s freeze-thaw cycle punish any weak points even further.
What Roof Flashing Actually Does and Why It Fails
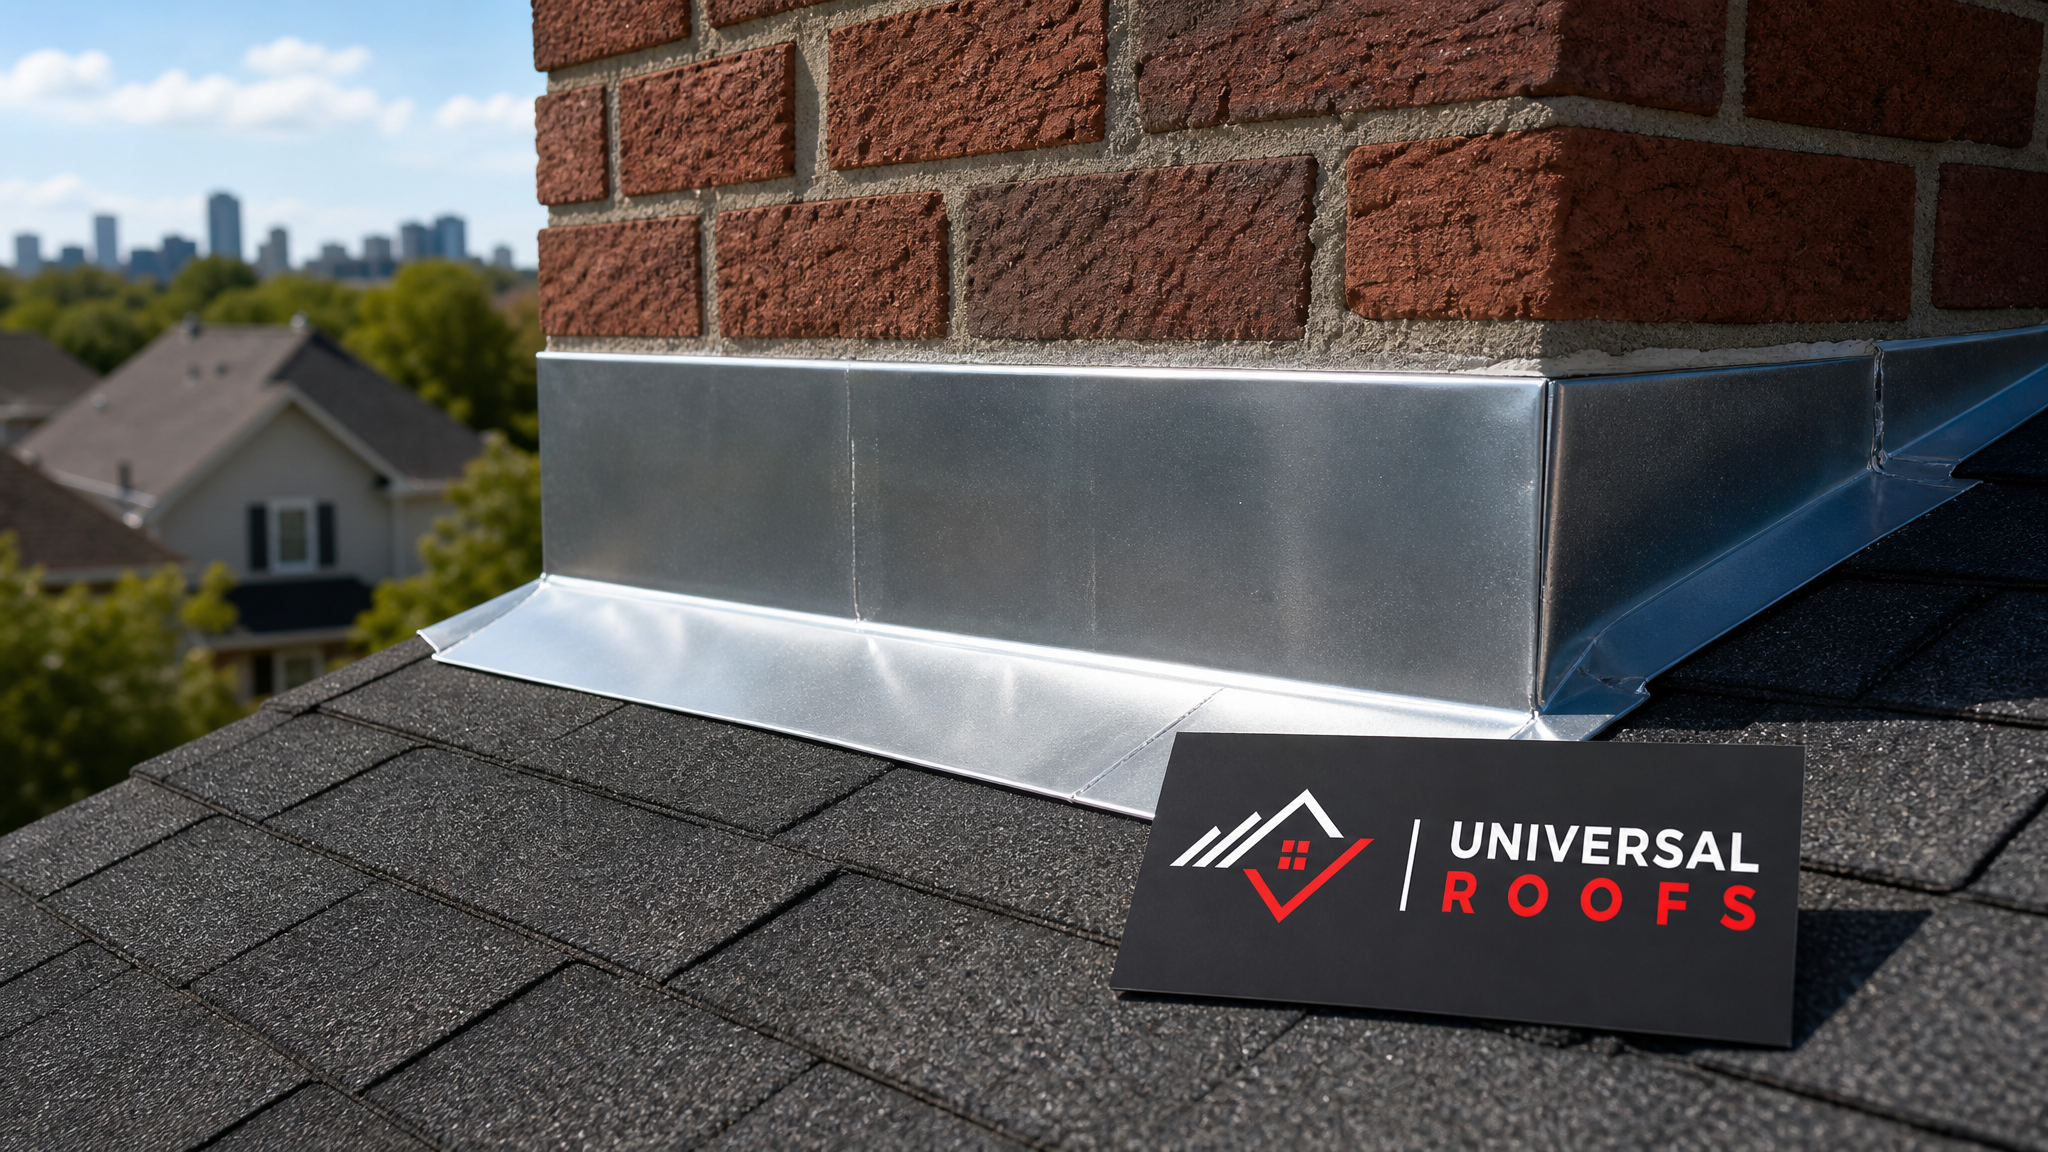
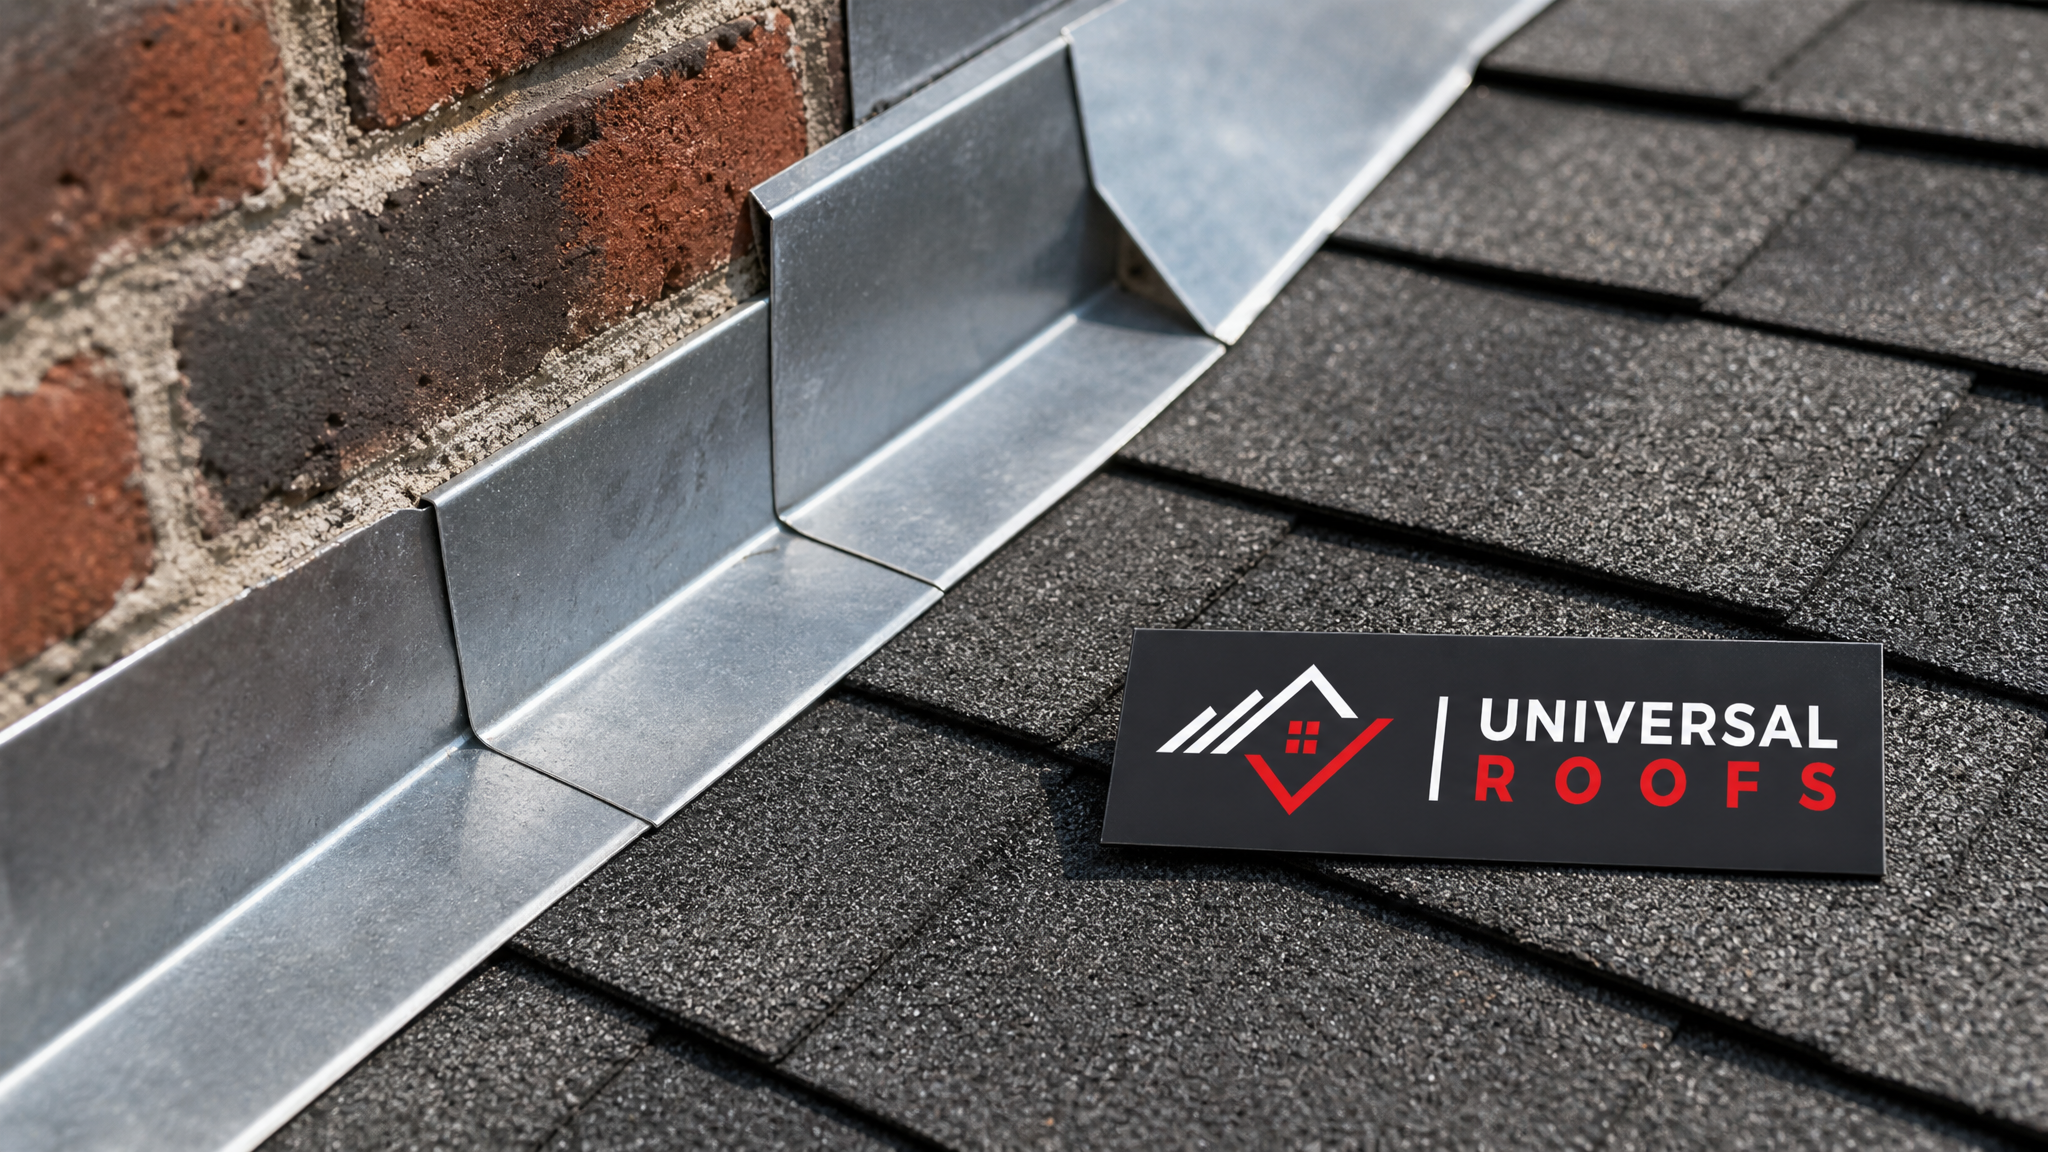
Flashing is installed anywhere two roof planes meet, or anywhere something interrupts the roof surface: chimneys, skylights, vent pipes, dormers, sidewalls, and valleys. It is usually made from galvanized steel, aluminum, or copper, and it is designed to shed water away from those vulnerable seams before it ever reaches the underlayment or roof deck. Shingles alone cannot seal these transition points, so flashing does the heavy lifting.
Flashing fails for a handful of predictable reasons, and understanding which one applies to your roof is the first step in any competent repair.
The most common cause in our market is simple age and thermal cycling. Toronto sees dramatic temperature swings between summer heat and winter cold, and that constant expansion and contraction works fasteners loose, cracks caulking, and eventually opens gaps at the laps where flashing pieces overlap. Sealant that looked fine five years ago becomes brittle, shrinks, and pulls away from the metal. Rust and corrosion also take a toll on galvanized flashing that has lost its protective coating, especially near valleys where water runs constantly. Physical damage from ice damming, falling branches, or even a previous roofing contractor cutting corners rounds out the usual suspects.
Before you touch a single fastener, it helps to understand the different flashing types you will encounter on a typical GTA roof, since the repair approach differs for each.
| Flashing Type | Common Location | Typical Failure Mode | DIY Difficulty |
|---|---|---|---|
| Step flashing | Roof-to-wall junctions, dormers | Individual pieces shift or corrode; caulk-only repairs by previous owners | Moderate to Hard |
| Counter-flashing | Chimneys (upper layer) | Mortar joint cracks, metal pulls out of masonry | Moderate |
| Base/apron flashing | Chimney base, dormer fronts | Sealant failure, rust-through at the bend | Easy to Moderate |
| Valley flashing | Where two roof slopes meet | Granule wear, pinholes, debris damming water | Hard |
| Vent pipe/pipe boot flashing | Plumbing and exhaust vents | Rubber gasket cracks and dries out (usually 8-12 years) | Easy |
| Drip edge flashing | Eaves and rakes | Bending, disconnection from fascia, ice damage | Moderate |
Signs Your Flashing Needs Repair
Most homeowners discover a flashing problem the same way: a stain appears on an interior ceiling or wall, usually near a chimney, skylight, or where an addition meets the main roofline. But you do not have to wait for interior damage to catch a flashing failure. A quick visual inspection from the ground with binoculars, or a careful walk of your attic with a flashlight after a rainstorm, can reveal problems much earlier.
Look for these warning signs specifically:
- Visible gaps, curling, or lifting where flashing meets shingles or masonry
- Rust streaks running down the flashing or the wall below it
- Cracked, shrunken, or missing caulking and sealant along flashing edges
- Daylight visible through gaps around a vent pipe boot from inside the attic
- Granules or debris pooling in valleys, suggesting the metal underneath is degrading
- Soft or discoloured drywall near chimneys, skylights, or dormers
- A musty smell in the attic, which often precedes visible staining
If you catch any of these early, a DIY roof flashing repair can often stop the problem before it requires a full roof repair or interior remediation. If you are seeing widespread staining across multiple rooms, or the flashing has clearly failed in more than two or three locations, that is usually a sign of a larger roofing system issue that goes beyond what a homeowner should tackle solo.
Tools and Materials You Will Need
A proper flashing repair does not require an enormous toolkit, but using the wrong materials is one of the fastest ways to turn a fifteen-minute fix into a recurring leak. Here is what we recommend keeping on hand before you start.
| Category | Item | Why It Matters |
|---|---|---|
| Safety | Sturdy extension ladder, ladder stabilizer, non-slip roofing shoes, work gloves | Most roofing injuries happen on the ladder, not the roof itself |
| Removal | Flat pry bar, utility knife, wire brush | Cleanly lifts shingles and strips old sealant without tearing the underlayment |
| Fastening | Roofing nails or stainless screws, hammer, drill | Galvanized or stainless fasteners resist corrosion far longer than standard nails |
| Sealing | Polyurethane roofing sealant or butyl-based flashing cement | Flexible, UV-stable sealants outlast standard silicone caulk on a roof by years |
| Materials | Matching flashing metal (aluminum or galvanized steel), pipe boot replacement | Mixing dissimilar metals (e.g., copper against galvanized steel) can cause galvanic corrosion |
| Measuring | Tin snips, tape measure, chalk line | Accurate cuts prevent gaps that recreate the original leak |
One material note worth repeating: never use ordinary exterior silicone caulk as your primary flashing sealant. It looks like an easy fix, but standard silicone degrades quickly under UV exposure and does not bond well to metal long term. Purpose-built roofing sealants or flashing cement, sometimes called plastic roof cement, are formulated to handle direct sun, ice, and thermal movement.
Step-by-Step: Repairing Common Flashing Problems
Repairing a Pipe Boot (Vent Flashing)
This is the most common and most beginner-friendly flashing repair, and honestly the one we most often recommend homeowners try themselves. The rubber collar around a plumbing or exhaust vent typically dries out and cracks within eight to twelve years, well before the surrounding shingles wear out.
- Carefully lift the shingles surrounding the pipe boot using a flat pry bar, working from the top down so you do not crack them.
- Remove the nails securing the old flashing base and slide it off the pipe.
- Install the new pipe boot over the vent pipe, sliding the metal or plastic base underneath the upper course of shingles and over the lower course, matching the original shingle-over-flashing pattern (this is critical for proper water shedding).
- Nail the base in place at the corners, then seal each nail head with roofing sealant.
- Apply a bead of sealant around the rubber collar where it meets the pipe for extra insurance, particularly in colder climates like ours where the rubber sees more thermal stress.
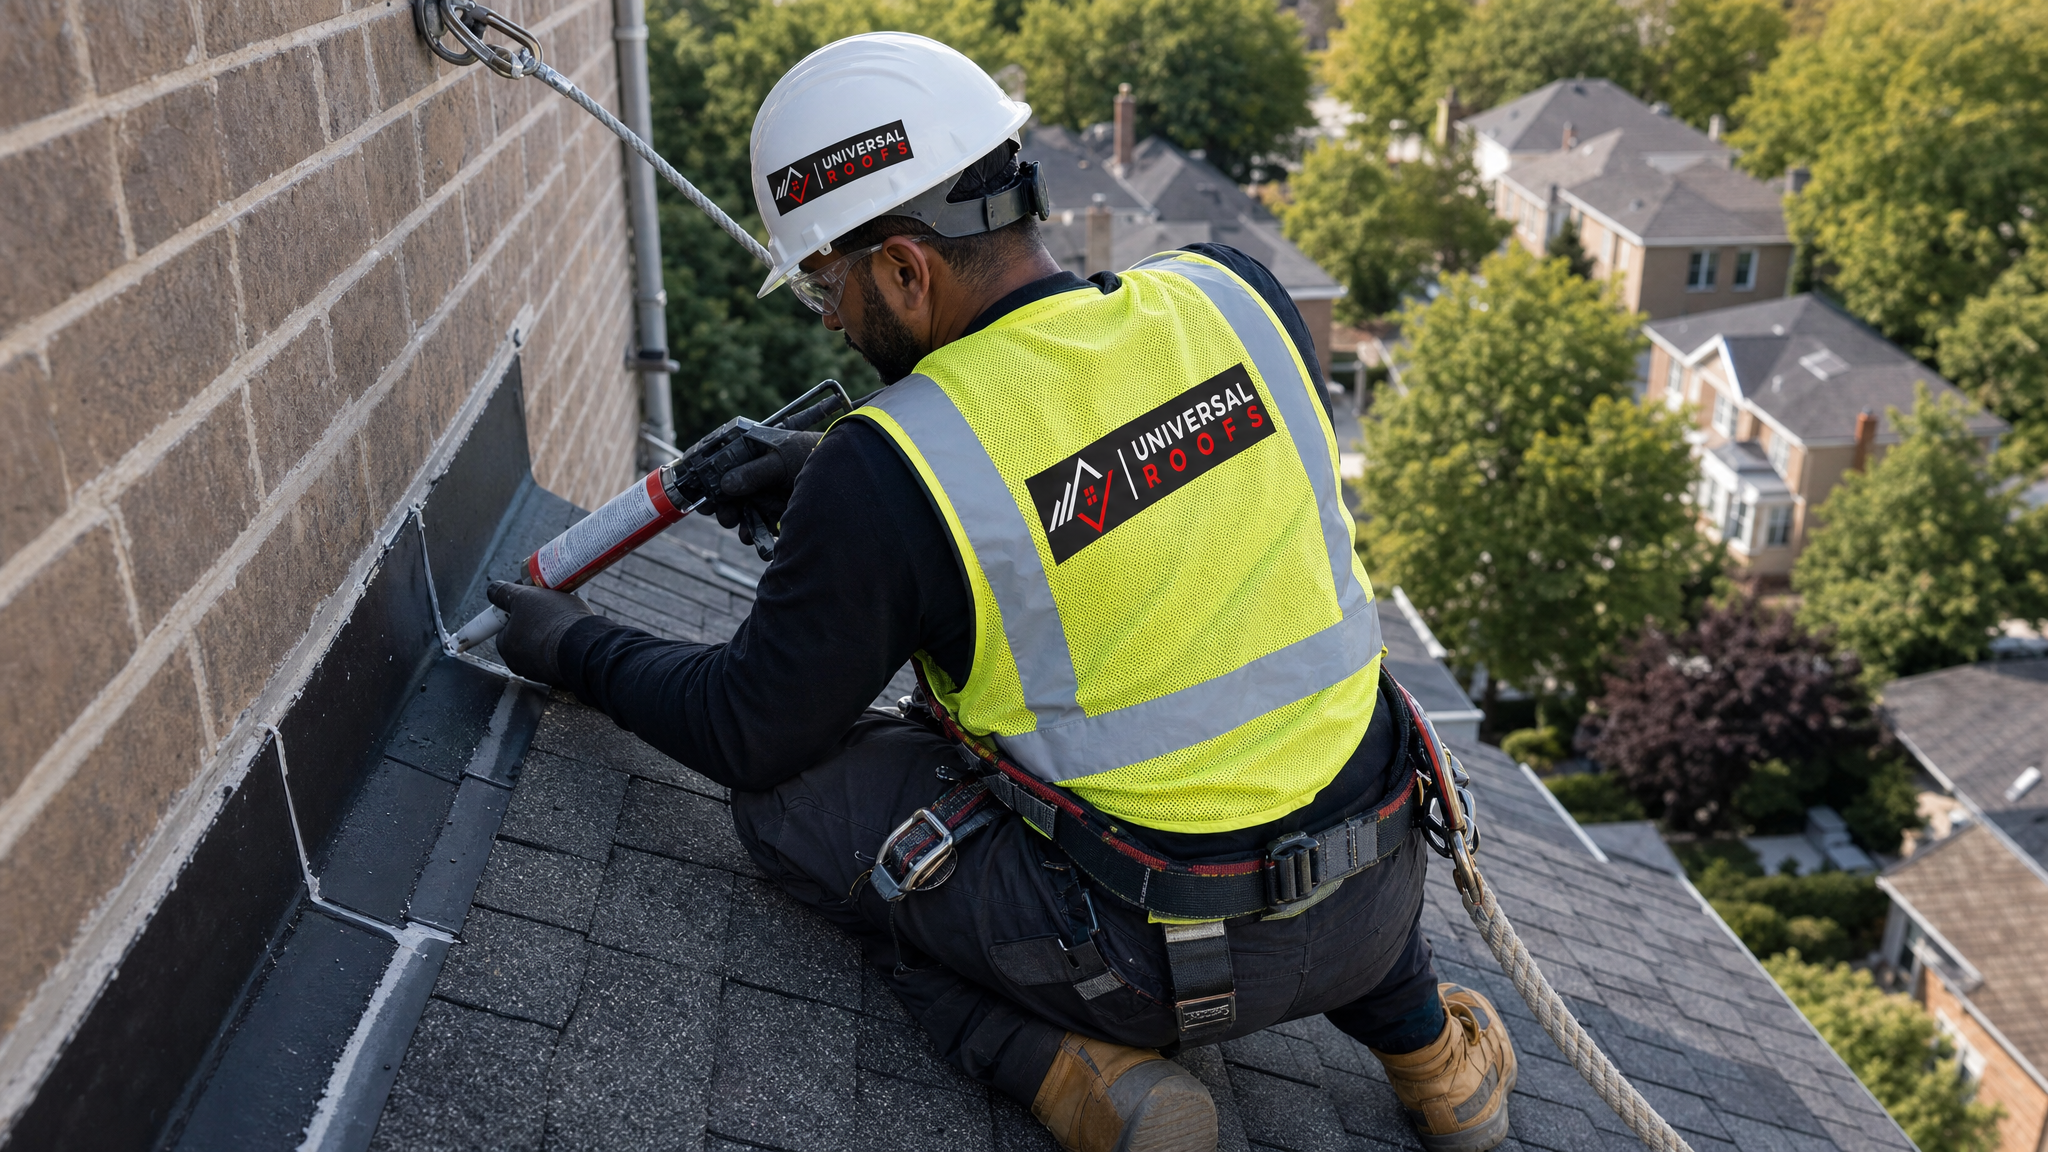
Resealing Chimney Flashing
Chimney flashing involves two layers: base flashing that runs up the chimney and under the shingles, and counter-flashing that is embedded into the mortar joints above it. Most DIY-friendly repairs here involve resealing rather than full replacement.
- Clean out the old, cracked sealant from the mortar joint using a wire brush or a flathead screwdriver, taking care not to gouge the masonry.
- Inspect the counter-flashing for any spots where it has pulled away from the brick. If it has separated more than a centimetre or two, it will need to be re-set into a fresh mortar joint or re-secured with masonry anchors.
- Apply a generous bead of high-quality roofing sealant or flashing cement along the joint between the counter-flashing and the masonry.
- Check the base flashing at the front (apron) and sides (step flashing) for lifted edges or rust-through spots, resealing or replacing individual pieces as needed.
- Smooth the sealant with a putty knife for a clean, water-shedding profile rather than leaving it as a thick, uneven bead that traps debris.
Fixing Step Flashing Along a Wall or Dormer
Step flashing is the trickiest repair on this list, and it is where we see the most failed DIY attempts. Each piece of step flashing is an individual L-shaped metal shingle that must be woven between courses of roof shingles and tucked behind the wall’s siding or cladding. If a homeowner simply caulks over the top of failing step flashing without addressing the underlying lap, the repair typically fails again within a season or two.
- Identify which individual piece or pieces of step flashing have shifted, corroded, or separated from the wall.
- Carefully remove the siding or cladding above the flashing (if accessible) or lift the shingle course above the damaged piece.
- Remove the damaged flashing piece and slide in a new, matching piece, ensuring at least 5 centimetres of overlap with the piece below it.
- Re-nail the flashing to the roof deck only, never through the siding, and reinstall the shingle and siding/cladding over top in the original shingle-then-flashing-then-siding sequence.
- Seal the top nail heads, but avoid sealing the bottom edge of each step, since that edge needs to remain open for water to drain out from behind the flashing.
If this sounds like more disassembly than you are comfortable with, it usually is. This is one of the most common points where a DIY roof flashing repair project should be handed to a professional, since improper reassembly can create a leak that is actually harder to diagnose than the original problem.
Common Mistakes That Cause Flashing Repairs to Fail
We get called out to fix a lot of “repaired” flashing every year, and the failures tend to fall into the same handful of categories. Learning from these mistakes before you start will save you a callback and, more importantly, save your ceiling.
| Mistake | Why It Fails | Better Approach |
|---|---|---|
| Caulk-only repair over a lap joint | Sealant bridges a gap instead of restoring proper shingle-over-flashing water flow; UV and cold crack it within 1-3 years | Replace or reposition the metal piece; use sealant as a supplement, not the primary defence |
| Mixing incompatible metals | Copper against galvanized steel or aluminum causes galvanic corrosion that eats through the weaker metal | Match the replacement flashing material to what already exists on the roof |
| Nailing directly through the flashing face | Creates a new penetration exactly where you are trying to stop water | Nail only at the top edge under the next shingle course, then seal the nail head |
| Skipping the underlayment check | Surface repair looks fine while rotted decking or torn underlayment underneath keeps leaking | Lift flashing fully to inspect the underlayment before resealing anything |
| Working on a wet or icy roof | Poor sealant adhesion plus a serious fall hazard | Only perform flashing repairs in dry, warm conditions like a summer afternoon |
How Much Does a Professional Flashing Repair Cost?
One of the most common questions homeowners ask before deciding whether to DIY is simply: what would it cost to have someone else do it? Pricing varies with roof pitch, accessibility, and how much flashing needs replacing versus resealing, but here is a general range we see across the GTA.
| Repair Type | Typical Cost Range (CAD) | Typical Timeline |
|---|---|---|
| Pipe boot replacement (single vent) | $150 – $350 | Under 1 hour |
| Chimney flashing resealing | $250 – $600 | 1-2 hours |
| Full chimney flashing replacement | $600 – $1,500 | Half day |
| Step flashing repair (per wall section) | $400 – $900 | Half day |
| Valley flashing replacement | $800 – $2,000+ | Full day |
| Emergency leak repair/tarping | $300 – $700 | Same day |
These figures assume a straightforward, accessible repair on a standard asphalt shingle roof. Steep pitches, multiple storeys, or roofs requiring scaffold access will push costs higher. If your flashing issues are widespread rather than isolated to a single point, it is often more cost-effective in the long run to address them as part of a broader roof repair visit rather than paying for repeated one-off callouts.
DIY vs. Calling a Professional: Making the Right Call
We are big believers in homeowners handling small, low-risk maintenance themselves. A pipe boot swap or a simple resealing job on a single-storey bungalow with a low-pitched roof is genuinely within reach for someone comfortable on a ladder. But there are situations where the risk, whether physical or financial, tips the scale toward calling in a professional.
Consider a professional if any of the following apply to your situation:
- Your roof pitch is steep enough that standing without a harness feels unsafe
- The house is two or more storeys, requiring extension ladder work at height
- You are seeing multiple, separate leak points rather than one isolated failure
- There is visible rot, sagging, or soft spots in the roof deck itself
- The flashing issue involves a valley, which requires shingles to be carefully cut and re-laced
- Your home is still under a roofing warranty, which a DIY repair could void
- You are not confident identifying which layer (base flashing, counter-flashing, or underlayment) is actually failing
Working at height is not something to take lightly, and the fall-protection gear a professional crew uses (harnesses, anchor points, roof jacks) is not something most homeowners own or know how to rig safely. When in doubt, an inspection from Universal Roofs costs far less than a fall injury or a redo of a failed DIY attempt.
Flashing Repair and the Rest of Your Roof System
It is worth remembering that flashing does not work in isolation. It is one component of an integrated water-shedding system that includes your shingles, underlayment, decking, and ventilation. A flashing repair on a roof that is otherwise nearing the end of its lifespan is a bit like patching one tire on a car that needs four new ones; it buys you time, but it is not a long-term solution.
If your roof replacement is coming up within the next few years anyway, it may make more sense to have flashing issues assessed as part of that planning rather than repairing them piecemeal. Similarly, if your flashing problems are concentrated around a skylight, the issue may be less about the flashing itself and more about aging skylight seals; our skylights and skylight replacement teams deal with this specific failure point often, since skylight flashing is among the most leak-prone details on any roof. And if you are dealing with a flat or low-slope section of roof, flashing repair techniques differ substantially from pitched-roof methods; our flat roofing page covers that in more detail.
Finally, do not overlook your attic. Persistent moisture from a flashing leak, even a small one, can lead to mould growth and insulation damage long before it shows up as a ceiling stain. If you suspect any lingering moisture issues after a repair, it is worth having your attic inspected for hidden damage.
Seasonal Timing for Flashing Repairs in the GTA
Timing matters more with flashing repair than most homeowners realize. Sealants and adhesives need warm, dry conditions to cure properly, generally above 4°C and with no rain expected for at least 24 hours. That makes late spring through early autumn, including right now in July, the ideal window for GTA homeowners to get ahead of flashing issues.
Waiting until autumn rains or the first winter freeze-thaw cycle sets in dramatically increases the risk that a small, fixable gap becomes a much larger problem. Water that gets behind flashing in the fall can freeze inside the wall or roof assembly over winter, expanding cracks and separations that were previously minor. If you have noticed any of the warning signs above, this summer is the right time to act, whether that means tackling a straightforward pipe boot repair yourself or scheduling a professional assessment for anything more involved.
What is the best material for a DIY roof flashing repair?
Can I do an ultimate DIY roof flashing repair myself, or should I hire a professional?
How long does a properly done flashing repair last?
What are the warning signs that my flashing needs repair?
Is summer a good time to repair roof flashing in Toronto?
How much does professional flashing repair cost compared to DIY?
Need Help With Ultimate DIY Roof Flashing?
Whether you are tackling a simple pipe boot swap yourself or you have decided a leaking valley or step flashing section is best left to trained hands, Universal Roofs is here to help GTA homeowners keep their roofs watertight through every season.
Call us today at (416) 732-2421 or request a free inspection to get started.
Universal Roofs proudly serves Toronto, Mississauga, Brampton, Vaughan, Markham, Oakville and the GTA since 2005.